Note: This article applies to the RedAPI and not the Storage Platform API. You can find our Storage Platform API documentation here.
Background
The RedApp is Redstor's web-based platform where MSPs manage data for their customers. As an MSP user of the RedApp, known as a Partner Admin, you will have top-level access, which includes the ability to:
- add customers (known as companies in the RedApp),
- subscribe customers to products,
- create users for customers,
- convert trials to paid subscriptions,
- see where your data is stored, and
- view the status of backup and recovery tasks.
While these actions can all be performed from the RedApp user interface, Partner Admins can also make use of the RedAPI, Redstor's REST API, to automate these actions.
Please note that only users with the Partner Admin role can access the RedAPI. Company Admins do not have this permission. For more on RedApp roles, see Article 1423.
Our APIs are designed with simplicity and ease of use in mind, making use of resource-oriented URLs and standard HTTP response codes. They accept JSON request bodies and return JSON-encoded responses, making it easy to integrate our APIs with your existing applications and workflows.
Using the RedAPI, you can experiment and test your API calls in a safe and controlled environment.
Note: The RedAPI is subject to a fair use policy and throttling.
Page contents
General
Redstor public API
Version: v2
All rights reserved
http://apache.org/licenses/LICENSE-2.0.html
Authentication
Service account creation
You can view Redstor’s public APIs while logged into the RedApp as a top-level user. However, to use the RedAPI, you will need a service account. To create one, follow the steps below.
1. In the RedApp, click on the RedAPI icon at the top right.
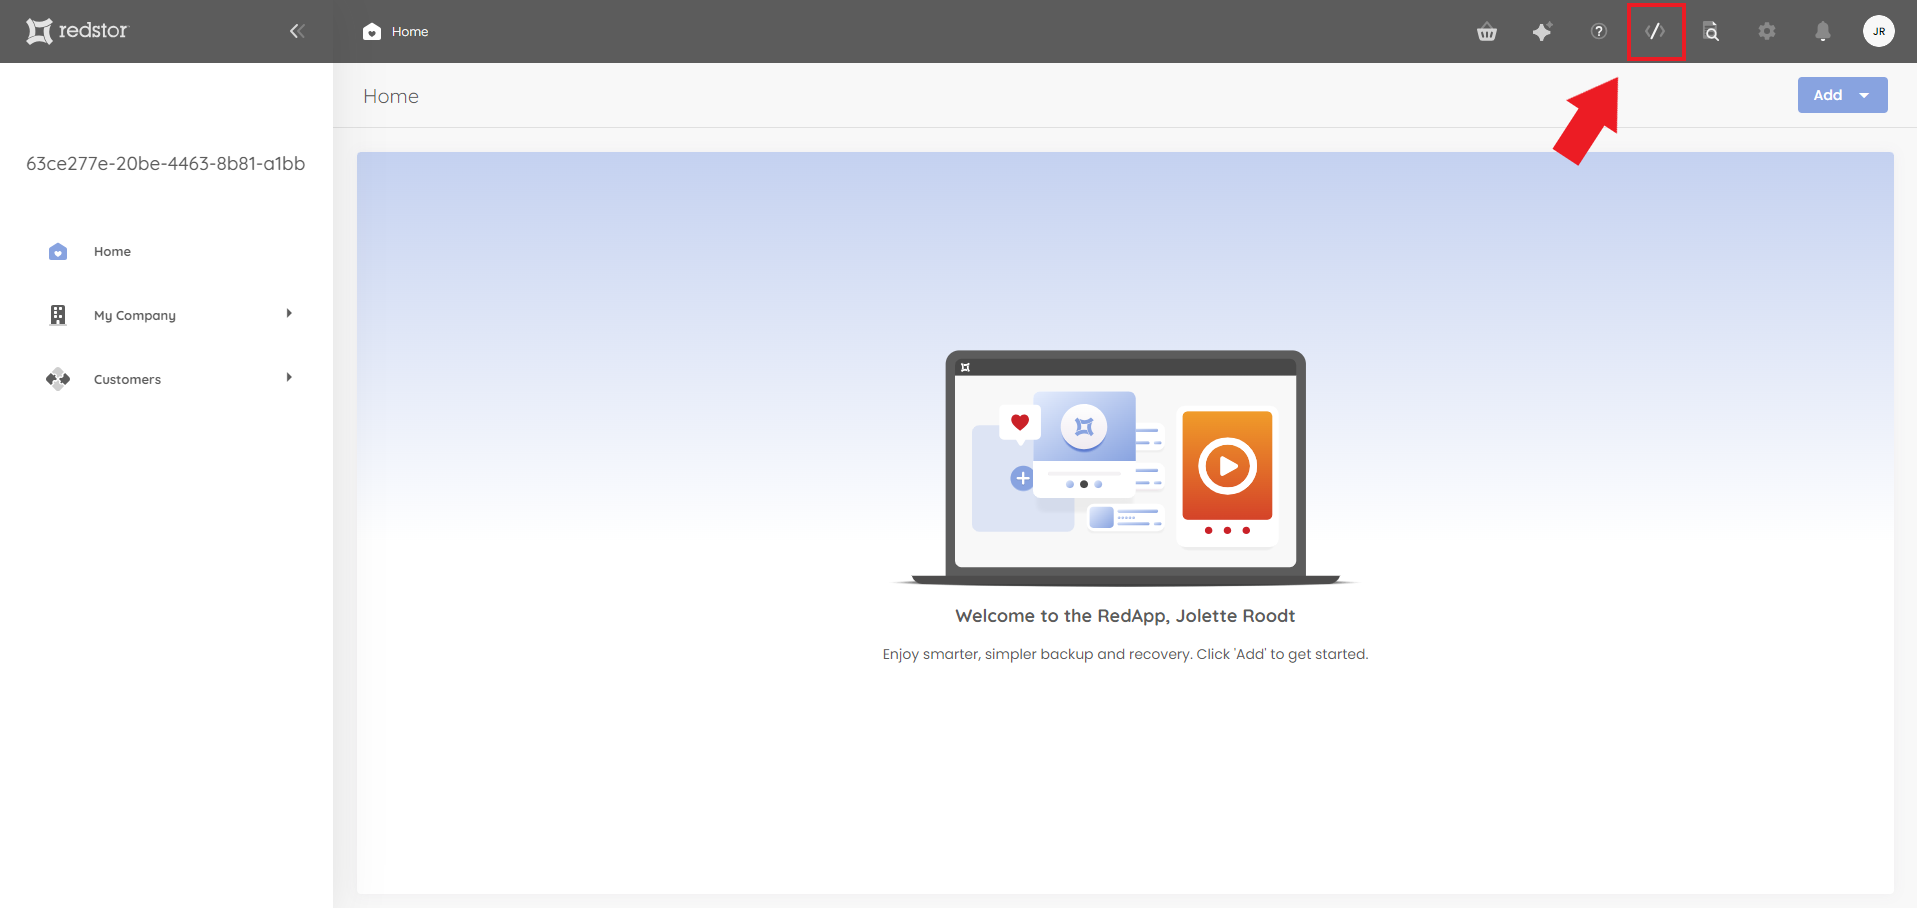
Note: If you would like to make use of the RedAPI but you do not see the RedAPI icon in the RedApp, please contact your account manager to arrange access.
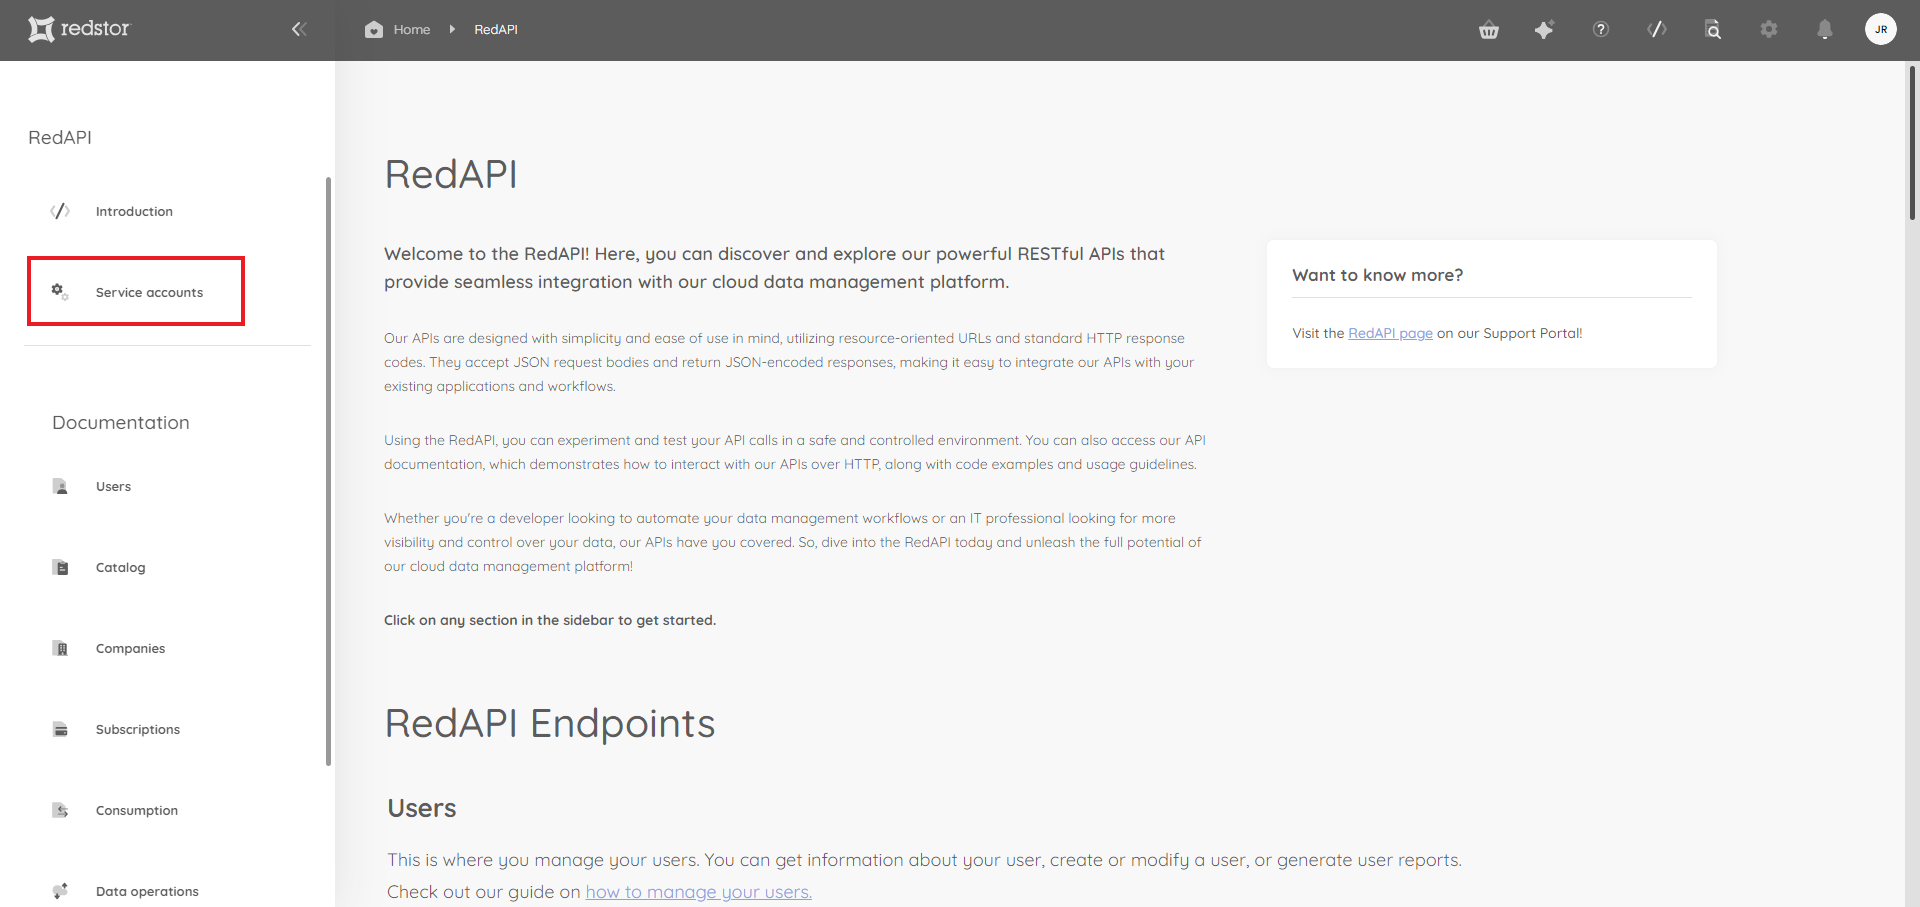
2. On the RedAPI page, click on Service accounts in the sidebar.
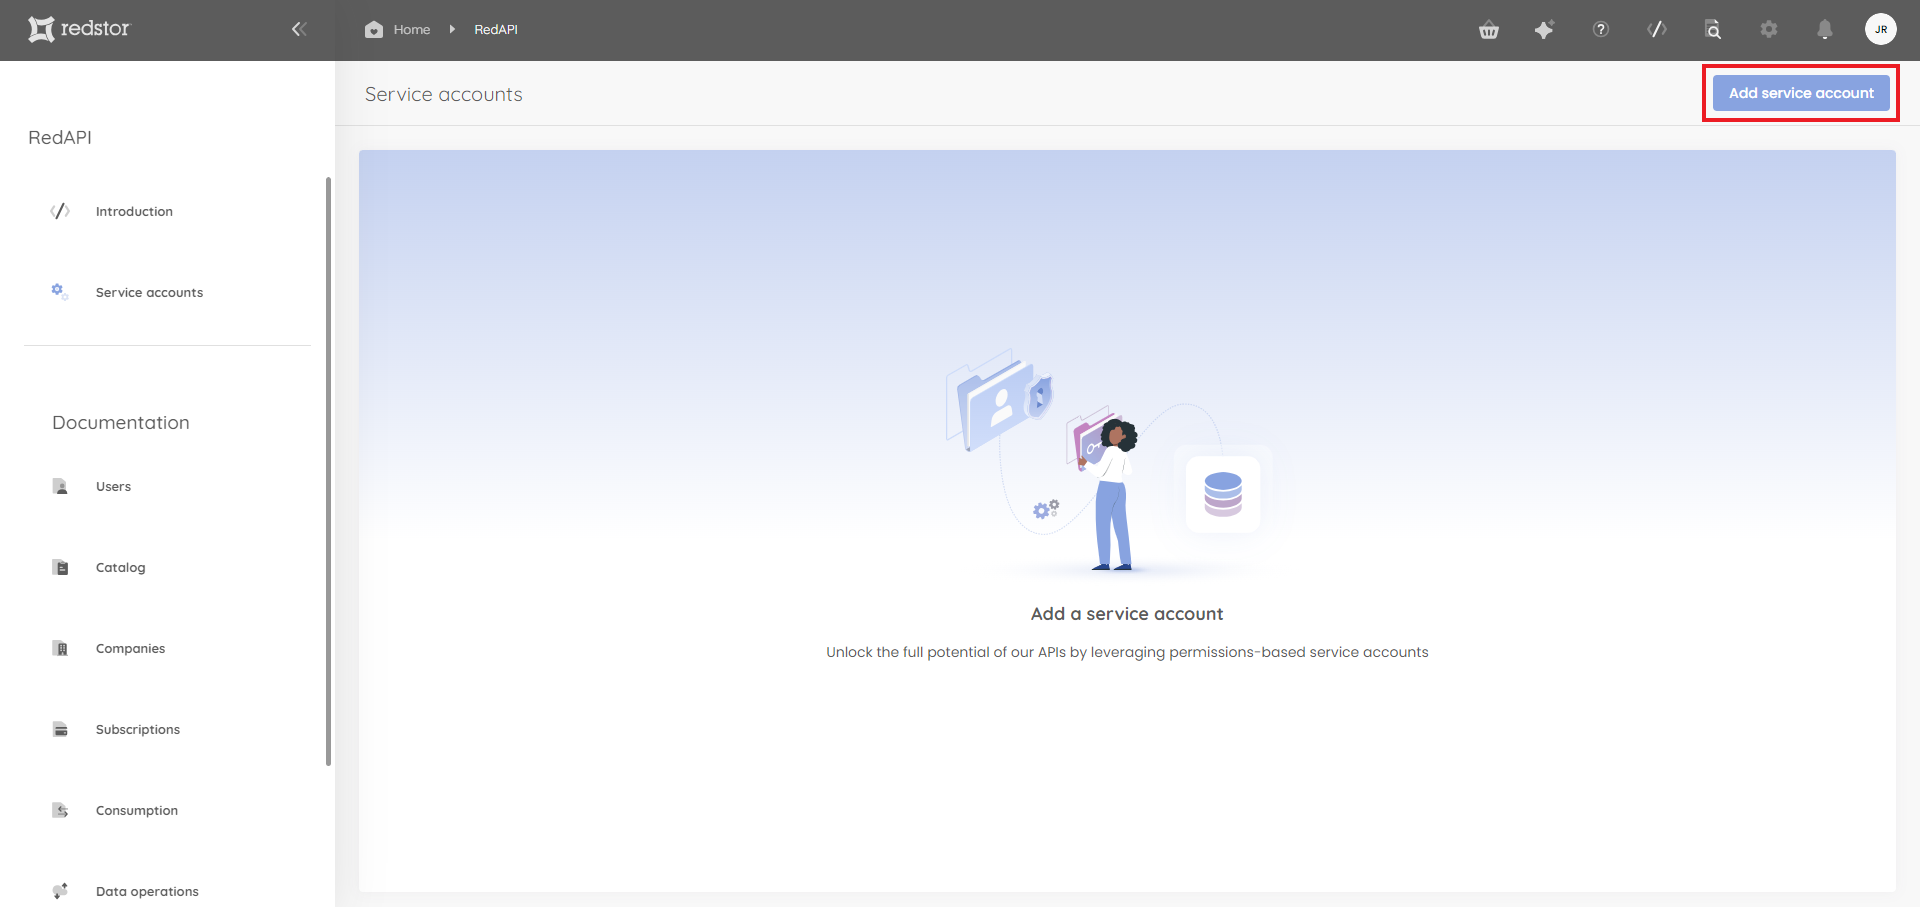
3. Click on Add a service account at the top right.
4. Under Service account details, add a name and description for the account.
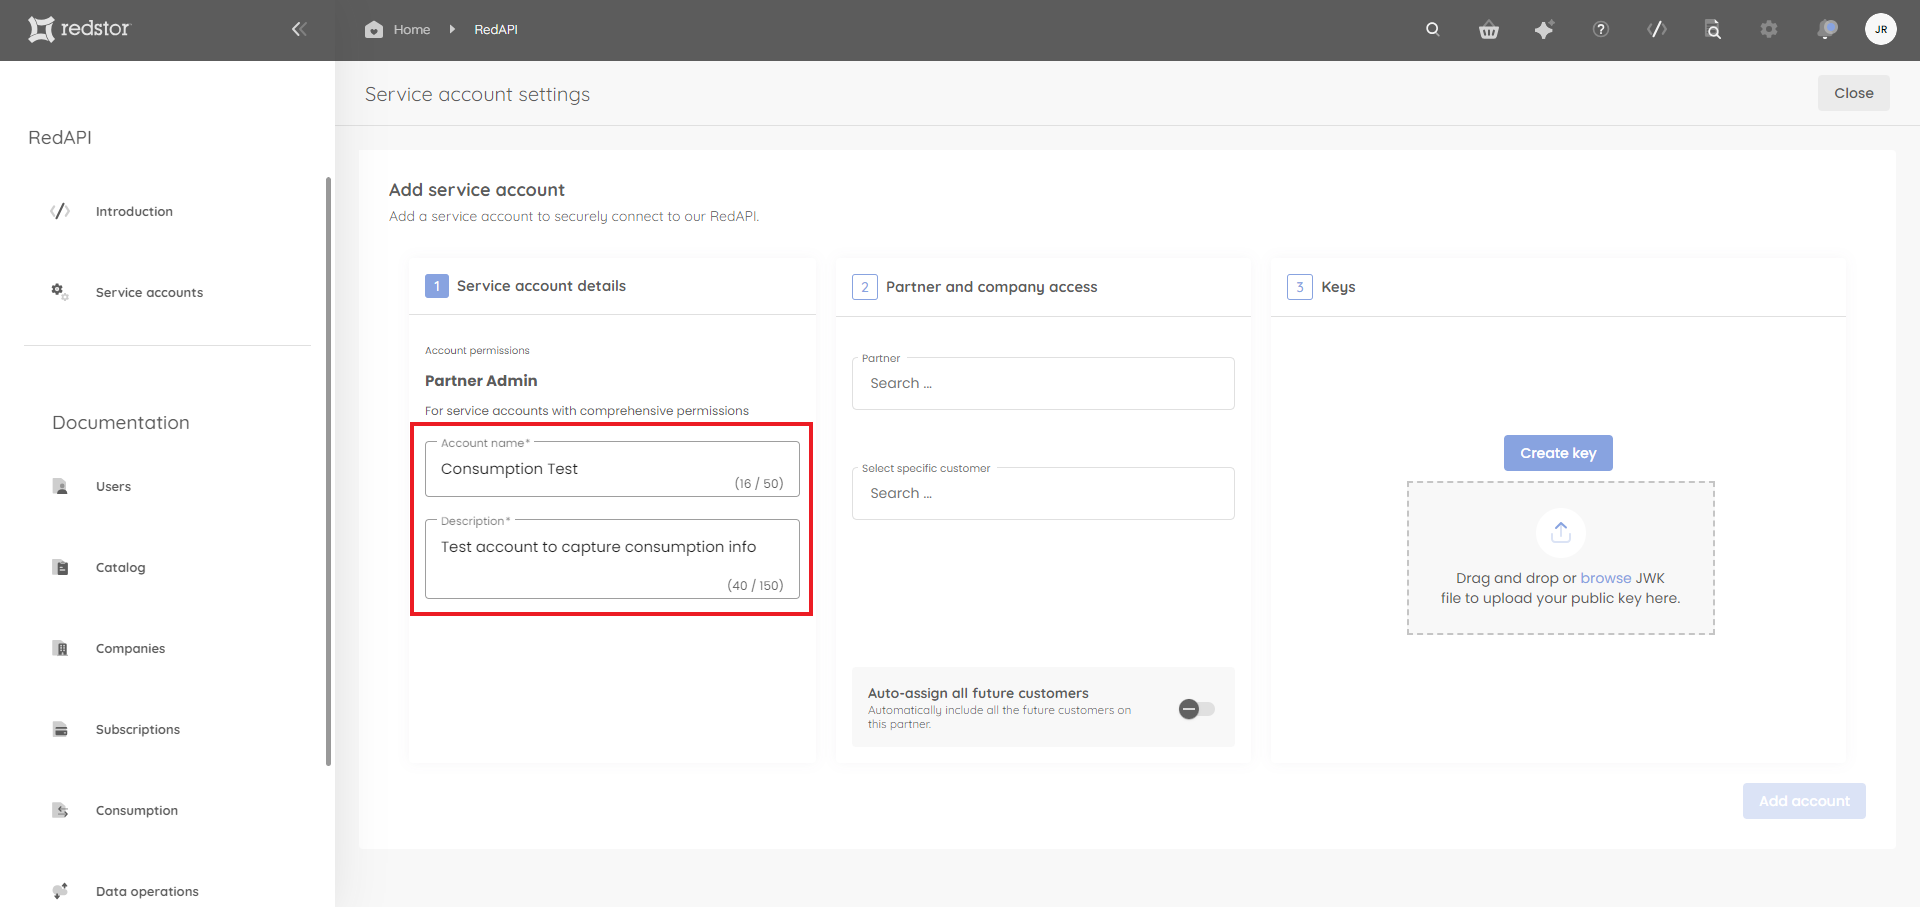
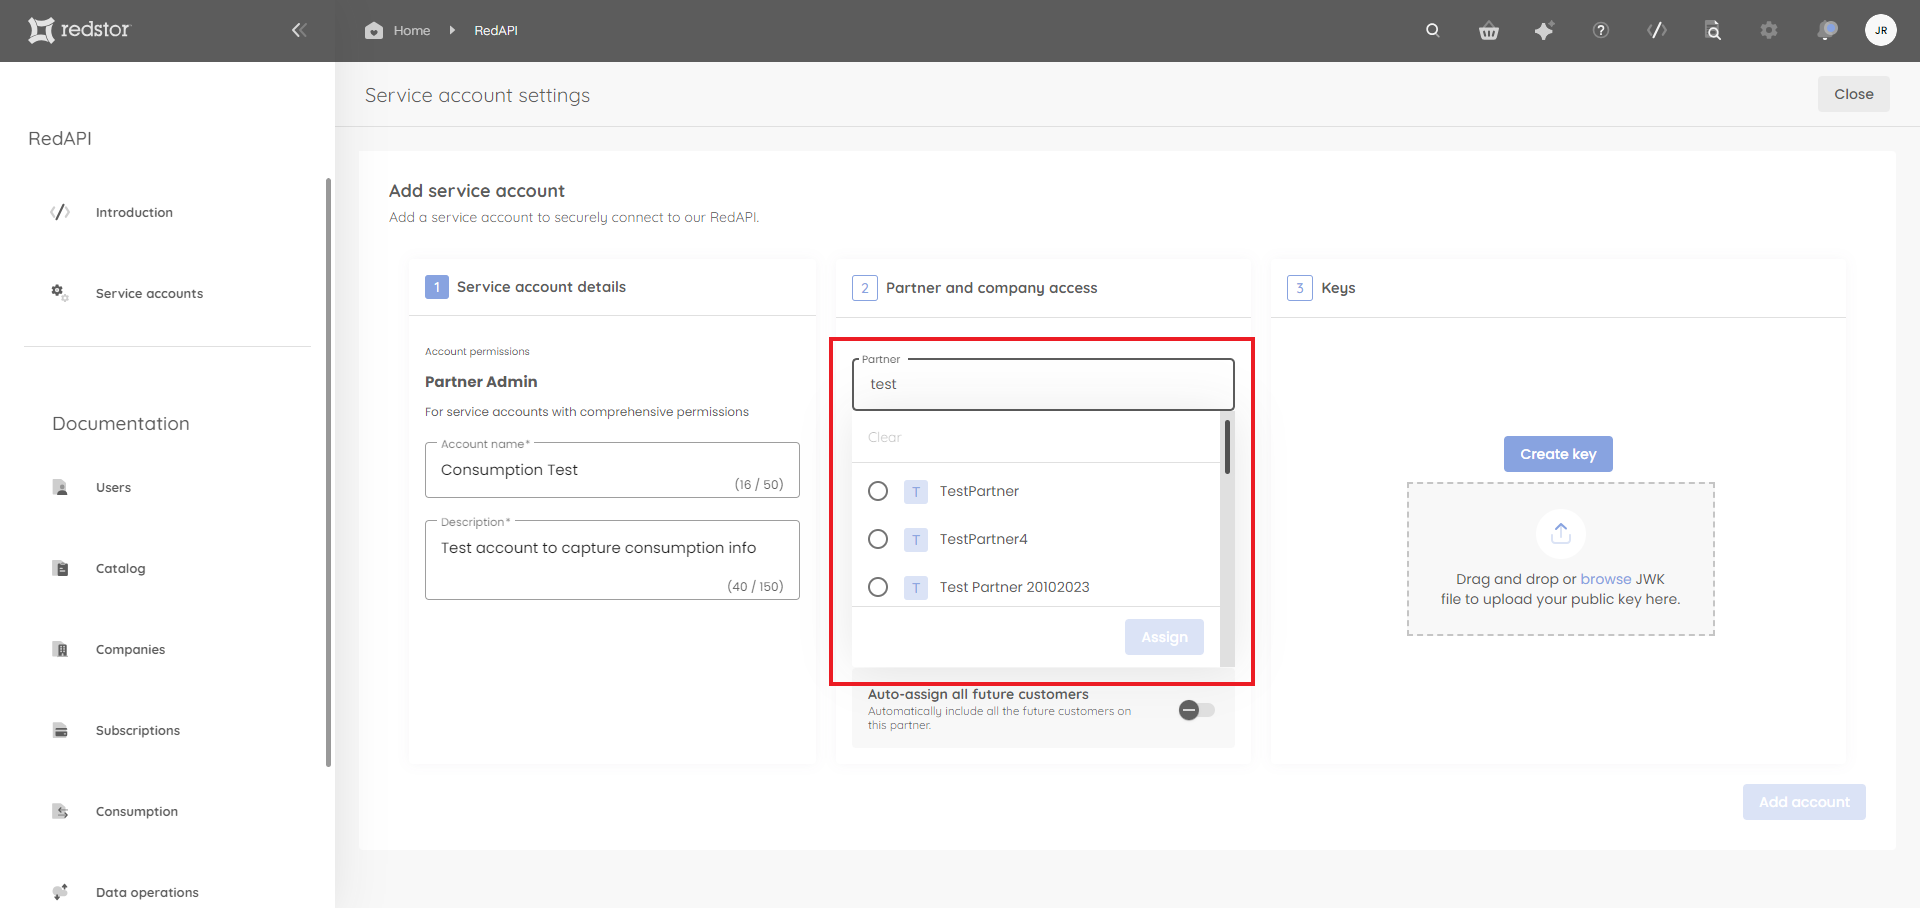
5. Under Partner and company access, select a partner from the menu or search for a specific partner. When you're ready, click Assign.
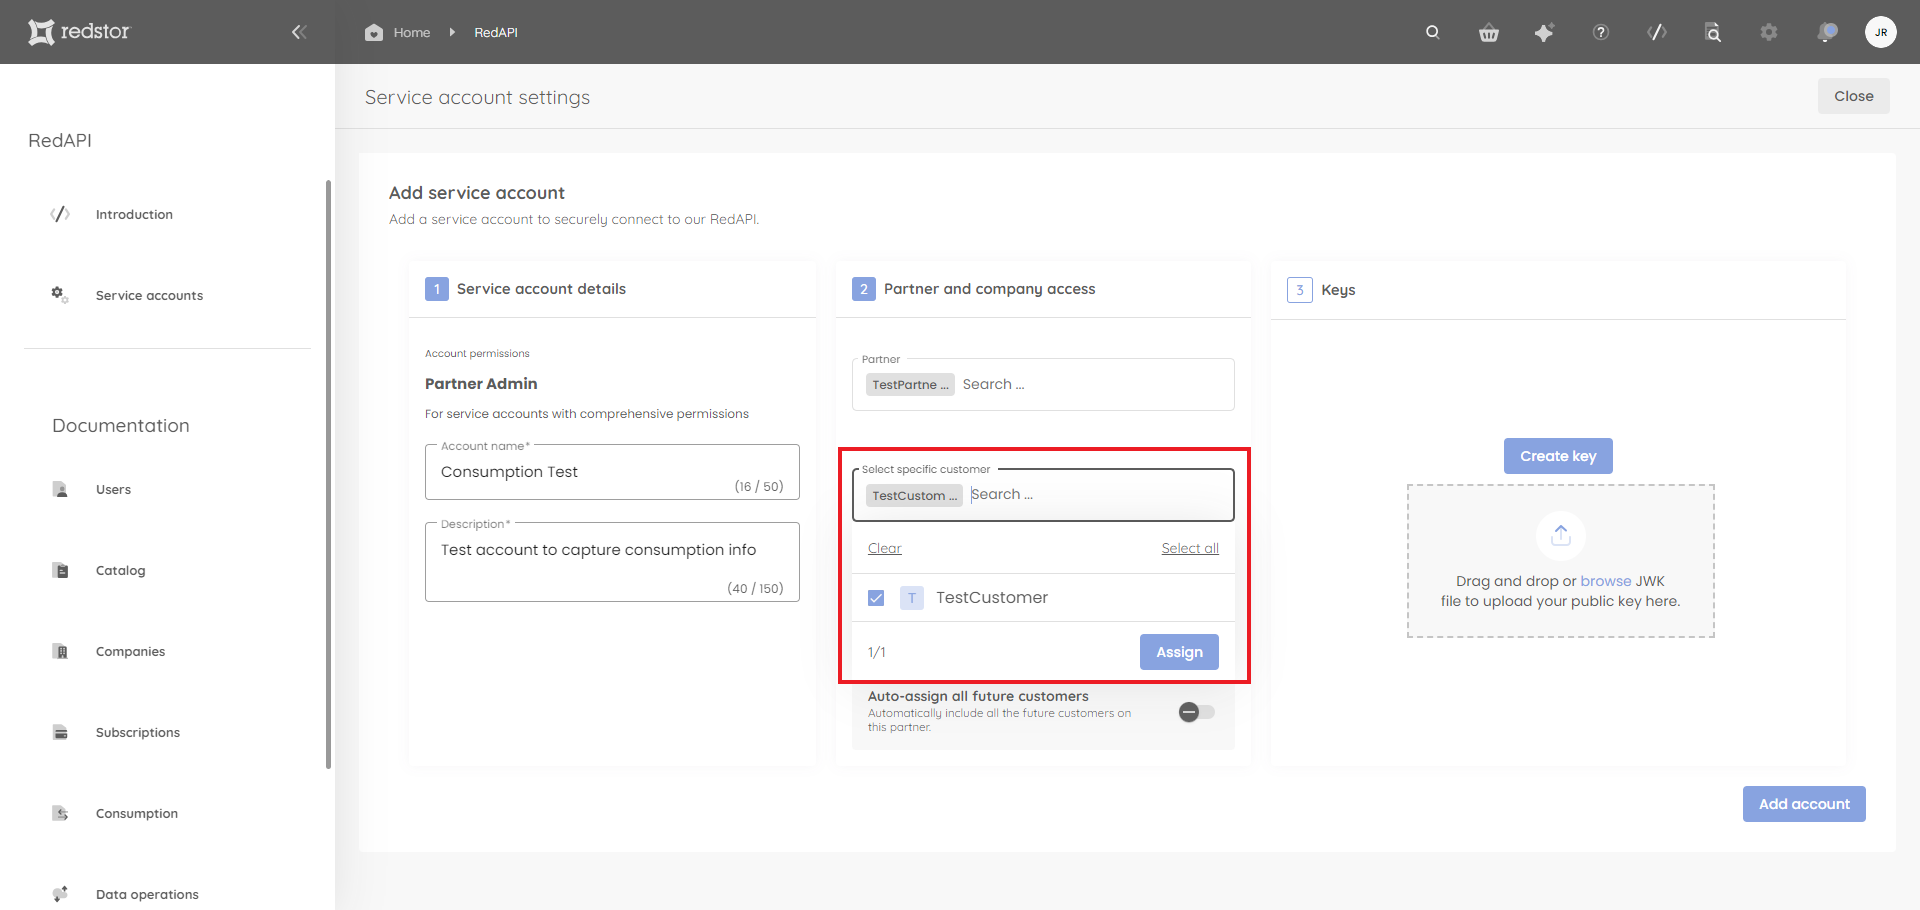
A list of customers under this partner will automatically be shown in the Select specific customer field. There, you can include/exclude customers by ticking/unticking company names from the list. The default is for all customers to be selected. When you're ready, click Assign.
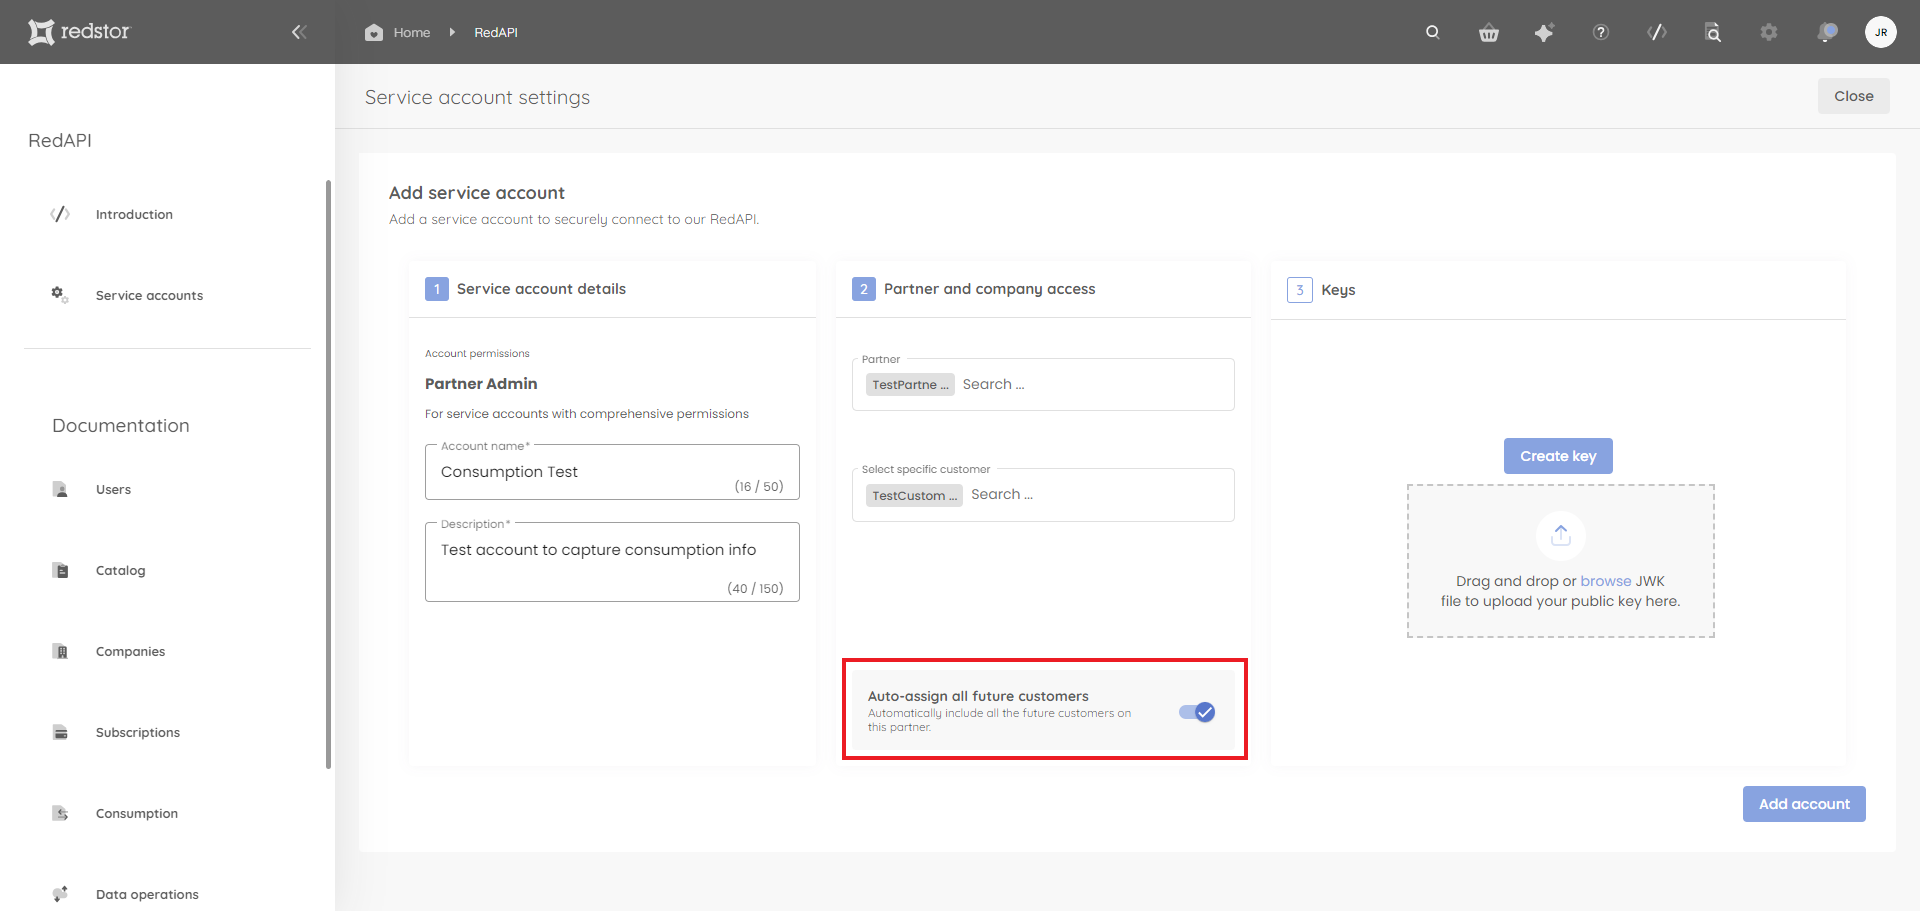
If you want new customers to have RedAPI access by default, you can enable Auto-assign all future customers.
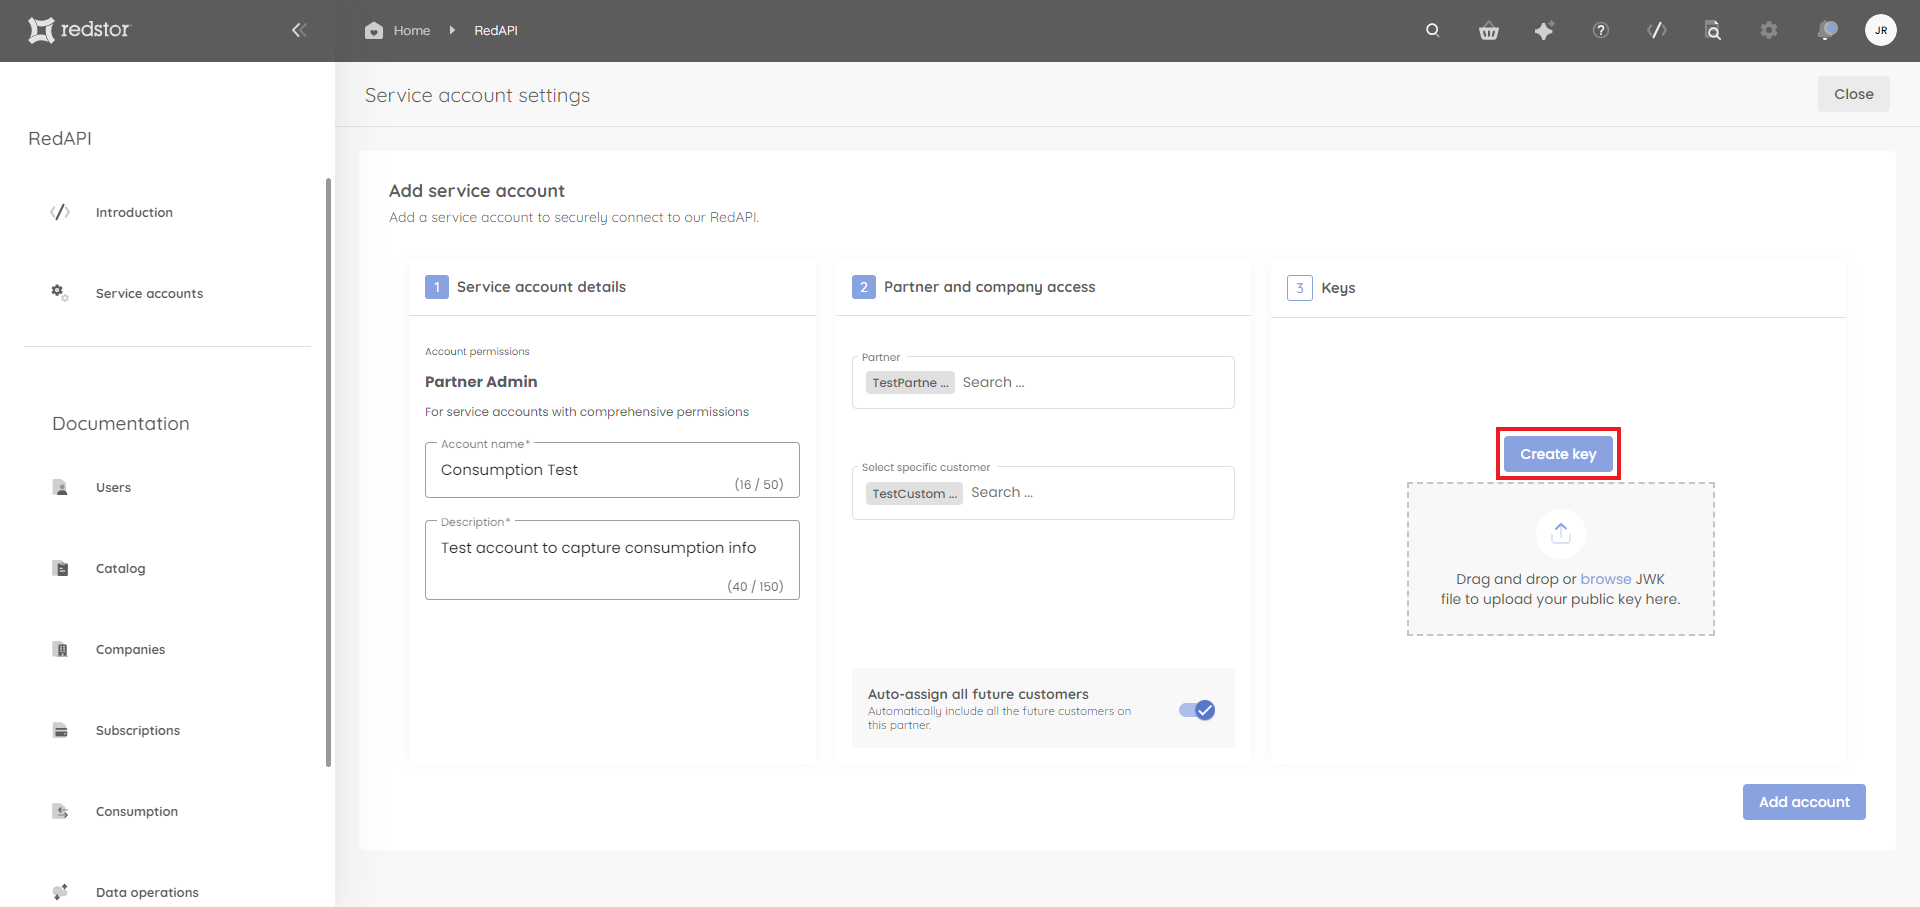
6. Under Keys, click Create key.
7. Provide a descriptive name for the key. Then click Next.
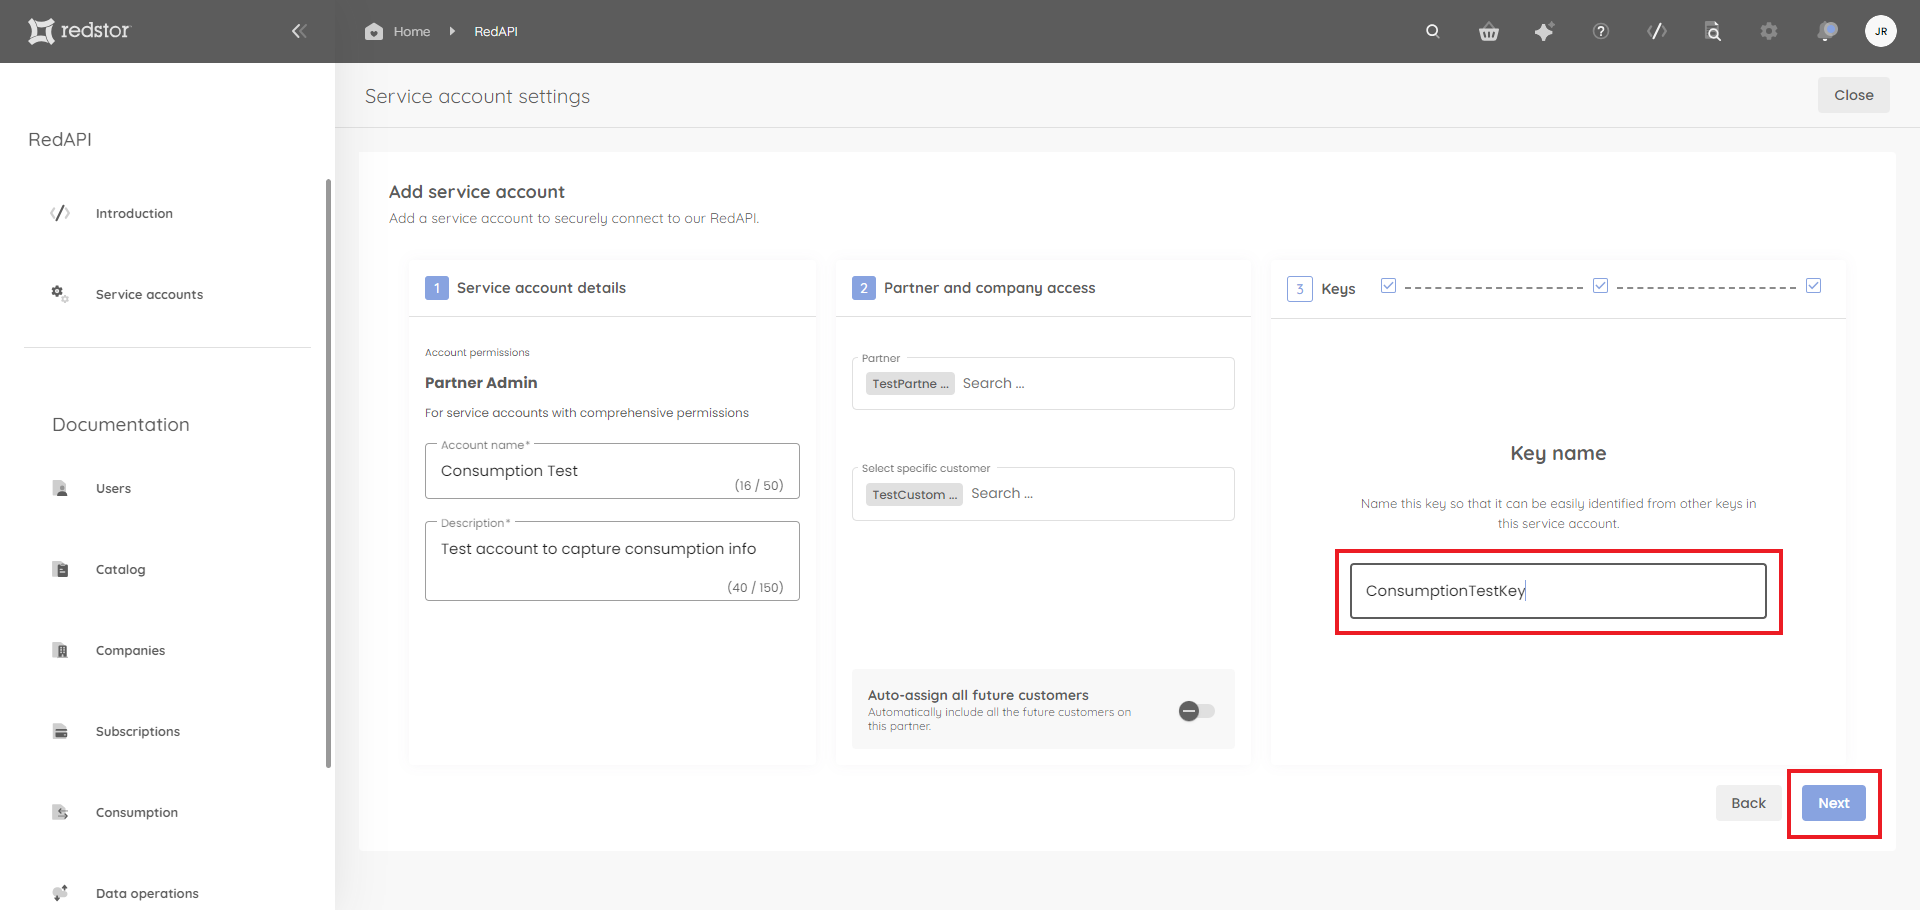
You will now need to authenticate with your RedApp credentials. A private and a public key will be generated. Click Download to save the keys to a location of your choice. Then click Done.
9. The newly created account, with its client ID, will now appear in the list on the Service accounts page.

You can filter this list by clicking on the filter icon at the top right of the table, next to the search field. You can filter by account status, key status or account creation date.
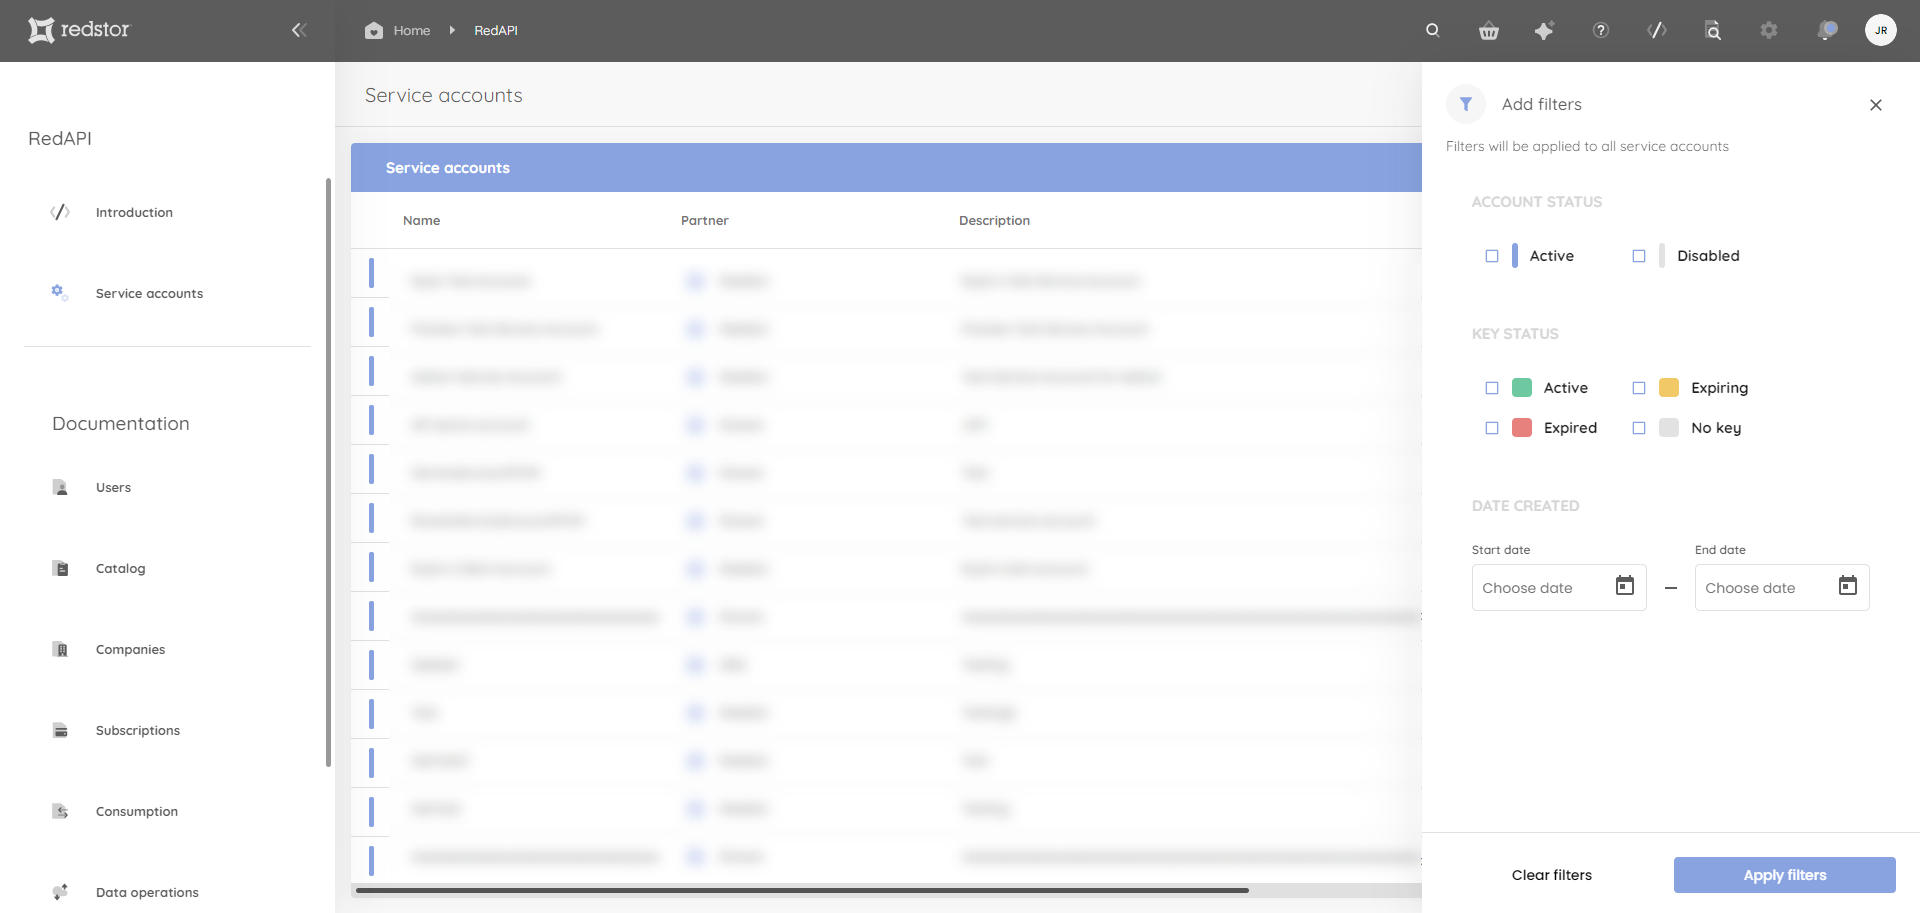
10. If you need to delete an account, locate the account in the list on the Service accounts page. Click on the menu (ellipsis) to its right and click Delete account. You will need to confirm the deletion and authenticate with your admin credentials.

Authentication
Authentication follows the OAuth2 Client Credentials flow using the private_key_jwt authentication method.
Retrieve the OpenID Configuration from https://id.redstor.com/.well-known/openid-configuration. Note the
token_endpoint.- Create a JWT with the following payload:
 {
"jti": "7186f958-1b78-479e-8f1f-72a44874c9ac",
"sub": "5d41008d-7388-4eec-b90f-f8234f461db6",
"iat": 1677232754,
"nbf": 1677232754,
"exp": 1677233054,
"iss": "5d41008d-7388-4eec-b90f-f8234f461db6",
"aud": "https://id.redstor.com/connect/token"
}
| Claim | Description |
| Randomly generated unique JWT ID |
| Subject - use the Client ID provided by Redstor |
| Issued At timestamp (current time) |
| Not Before timestamp (current time) |
| Expiry timestamp (current time + 5 min) |
| Issuer - use the Client ID provided by Redstor |
| Audience - the token_endpoint from the retrieved OpenID Configuration |
3. Sign the JWT using the private key.
4. Get an access token from the token_endpoint.
POST https://id.redstor.com/connect/token HTTP/1.1
Host: id.redstor.com
Accept: application/json
Content-Type: application/x-www-form-urlencoded

grant_type=client_credentials&scope=api.read%20api.write&resource=https%3A%2F%2Fapi.
redstor.com%2F&client_assertion_type=urn%3Aietf%3Aparams%3Aoauth%3Aclient-assertion-type%3Ajwt-bearer&
client_assertion=<SIGNED-JWT>
| Key | Value |
| client_credentials |
| api.read api.write |
| urn:ietf:params:oauth:client-assertion-type:jwt-bearer |
| The signed JWT |
5. The token_endpoint will respond with an access token on success:
{
"access_token": "<TOKEN-VALUE>",
"expires_in": 3600,
"scope": "api.read api.write",
"token_type": "Bearer"
}
6. Invoke the API endpoint with the returned access token:
GET https://api.redstor.com/<ENDPOINT> HTTP/1.1
Host: api.redstor.com
Authentication: Bearer <TOKEN-VALUE>
...
7. If the token expires, repeat this process to get a new access token.
Sample code
Option 1: PowerShell
Note:
- Install the Powershell JWT module if not already installed (also mentioned in the script).
- Replace the "clientId" with yours.
- Replace the "jwkFilePath" with the path to your JWK file (private key) provided by the RedApp.
# Install required module if not already installed (run once)
# Install-Module -Name JWT -Scope CurrentUser

# Parameters
$tokenEndpoint = "https://id.redstor.com/connect/token"
$clientId = "00000000-0000-0000-00000000000000000" # Replace with your client ID
$scope = "api.read api.write"
$jwkFilePath = "C:\RedApi\my_private_key.jwk" # Replace with the path to your JWK file

# Function to create a JWT using JWK
function New-Jwt {
    param (
        [string]$clientId,
        [string]$tokenEndpoint,
        [string]$jwkFilePath
    )

    # Read JWK from file
    if (-not (Test-Path $jwkFilePath)) {
        Write-Error "JWK file not found at: $jwkFilePath"
        exit
    }
    $jwkJson = Get-Content -Path $jwkFilePath -Raw
    $jwk = $jwkJson | ConvertFrom-Json

    # Create RSA security key from JWK
    $rsaParameters = [System.Security.Cryptography.RSAParameters]::new()
    $rsaParameters.Modulus = [System.Convert]::FromBase64String($jwk.n)
    $rsaParameters.Exponent = [System.Convert]::FromBase64String($jwk.e)
    $rsaParameters.D = [System.Convert]::FromBase64String($jwk.d)
    $rsaParameters.P = [System.Convert]::FromBase64String($jwk.p)
    $rsaParameters.Q = [System.Convert]::FromBase64String($jwk.q)
    $rsaParameters.DP = [System.Convert]::FromBase64String($jwk.dp)
    $rsaParameters.DQ = [System.Convert]::FromBase64String($jwk.dq)
    $rsaParameters.InverseQ = [System.Convert]::FromBase64String($jwk.qi)

    $rsa = [System.Security.Cryptography.RSA]::Create()
    $rsa.ImportParameters($rsaParameters)

    # Create JWT header
    $header = @{
        alg = "RS256"
        typ = "JWT"
        kid = $jwk.kid
    } | ConvertTo-Json -Compress

    # Create JWT payload
    $iat = [int]([DateTime]::UtcNow - [DateTime]::UnixEpoch).TotalSeconds
    $exp = $iat + 3600 # Token valid for 1 hour
    $payload = @{
        iss = $clientId
        sub = $clientId
        aud = $tokenEndpoint
        iat = $iat
        exp = $exp
        jti = [Guid]::NewGuid().ToString()
    } | ConvertTo-Json -Compress

    # Encode header and payload
    $headerBase64 = [Convert]::ToBase64String([System.Text.Encoding]::UTF8.GetBytes($header)) -replace '\+', '-' -replace '/', '_' -replace '=+$', ''
    $payloadBase64 = [Convert]::ToBase64String([System.Text.Encoding]::UTF8.GetBytes($payload)) -replace '\+', '-' -replace '/', '_' -replace '=+$', ''

    # Create signing input
    $signingInput = "$headerBase64.$payloadBase64"

    # Sign the JWT
    $sha256 = [System.Security.Cryptography.SHA256]::Create()
    $hash = $sha256.ComputeHash([System.Text.Encoding]::UTF8.GetBytes($signingInput))
    $signature = $rsa.SignHash($hash, [System.Security.Cryptography.HashAlgorithmName]::SHA256, [System.Security.Cryptography.RSASignaturePadding]::Pkcs1)
    $signatureBase64 = [Convert]::ToBase64String($signature) -replace '\+', '-' -replace '/', '_' -replace '=+$', ''

    # Combine to form JWT
    return "$signingInput.$signatureBase64"
}

# Create client assertion (JWT)
$clientAssertion = New-Jwt -clientId $clientId -tokenEndpoint $tokenEndpoint -jwkFilePath $jwkFilePath

# Prepare the token request
$body = @{
    grant_type = "client_credentials"
    client_id = $clientId
    client_assertion_type = "urn:ietf:params:oauth:client-assertion-type:jwt-bearer"
    client_assertion = $clientAssertion
    scope = $scope
}

# Make the token request
try {
    $response = Invoke-RestMethod -Uri $tokenEndpoint -Method Post -Body $body -ContentType "application/x-www-form-urlencoded"
    Write-Output "Access Token: $($response.access_token)"
    Write-Output "Token Type: $($response.token_type)"
    Write-Output "Expires In: $($response.expires_in)"
}
catch {
    Write-Error "Failed to obtain access token: $($_.Exception.Message)"
}
Option 2: C#
The following packages are used in this code:
- IdentityModel/6.0.0
- Microsoft.IdentityModel.Tokens/6.10.0
- System.IdentityModel.Tokens.Jwt/6.10.0
var clientId = "<CLIENT-ID>";
var discovery = await httpClient.GetDiscoveryDocumentAsync("https://id.redstor.com/");
if (discovery.IsError) { /* ... */ }

// get private key

var privateJwk = new JsonWebKey(File.ReadAllText("private.jwk"));
var signingCredentials = new SigningCredentials(privateJwk, "RS256");

// create and sign client_assertion

var now = DateTime.UtcNow;
var token = new JwtSecurityToken(
    clientId,
    discovery.TokenEndpoint,
    new List<Claim>
    {
      new(JwtClaimTypes.JwtId, CryptoRandom.CreateUniqueId()),
      new(JwtClaimTypes.Subject, clientId),
      new(JwtClaimTypes.IssuedAt, now.ToEpochTime().ToString(), ClaimValueTypes.Integer64)
    },
    now,
    now.AddMinutes(5),
    signingCredentials);
var tokenHandler = new JwtSecurityTokenHandler();
var clientAssertion = tokenHandler.WriteToken(token);

// authenticate

var tokenResponse = await httpClient.RequestClientCredentialsTokenAsync(
    new ClientCredentialsTokenRequest
    {
      Address = discovery.TokenEndpoint,
      ClientAssertion =
      {
        Type = OidcConstants.ClientAssertionTypes.JwtBearer,
        Value = clientAssertion
      },
      Scope = "api.read api.write",
    });

if (tokenResponse.IsError) { /* ... */ }

// invoke RedAPI

httpClient.SetBearerToken(tokenResponse.AccessToken);

var response = await httpClient.GetAsync("https://api.redstor.com/...")
Errors
Redstor uses conventional HTTP response codes to indicate the success or failure of an API request.
In general, any codes in the 2xx range indicate success, while codes in the 4xx range indicate an error that failed given the information provided. Any codes in the 5xx range indicate an error in Redstor’s services. Most errors have a descriptive error message included.
Pagination
Pagination is implemented uniformly across all the APIs. Redstor’s pagination strategy follows the continuation token style.
Pagination parameters
Three parameters define the pagination request:
maxResults (optional)
Query Parameter — The maximum number of results to return format: int32
Notes — Use a value between 1 and 100. Defaults to 30
pageToken (optional)
Query Parameter — Token to get the next page: String
shouldReturnCount (optional)
Query Parameter — Indicate whether or not the response should include the total number of items that match the set of constraints: boolean
Notes — The count will not be returned by default. When the count is present, it would be available on the first page of the paged dataset
Implementation guide
- Initial request
GET /endpoint?maxResult=2&shouldReturnCount=true Start by making the initial request without any nextPageToken. This will return the first pages as seen in the example response below:
Initial response:
1{
2   "nextPageToken":"CiAKGjBpNDd2Nmp2Zml2cXRwYjBpOXA",
3   "totalCount":10,
4   "results":[]
16}
Subsequent requests
GET /endpoint?maxResult=2&shouldReturnCount=true&pageToken=CiAKGjBpNDd2N The subsequent query takes the value from the returned result from the previous request’s nextPageToken and submits it as the value for pageToken.
This would return the first page as seen in the example response below:
Subsequent response:
1{
2   "nextPageToken":" YjBpOXA274453707NDd2Nmp2Zml2cXR",
3   "totalCount":-1,
4   "results":[]
16}
The API will continue to return a reference to the next page of results in the nextPageToken property with each response until all pages of the results have been read. Therefore, to read all results, continue to query the endpoint, each time passing in the pageToken until the nextPageToken property isn’t returned.
Versioning
Versioning an API can help to ensure compatibility with existing clients, improve stability, provide better control over the deprecation process, and improve documentation. While path versioning was originally used as the versioning strategy for the API Portal, this has now been standardised to query parameter version. This approach involves including the API version as a query parameter when making requests. For example, an API endpoint might have a URL structure like http://api.example.com/endpoint?apiVersion=1, with the desired version specified as a query parameter. When a breaking change is introduced on the endpoint, a new version of that endpoint is created, and the query parameter will then updated as follows: http://api.example.com/endpoint?apiVersion=2.
Note: Major and minor versions can be used. When no version is specified, the latest version is to be assumed.
OpenAPI specification

.png)


 1.png)