
.png)


PAGE CONTENTS
Introduction
Backup and recovery of SharePoint forms part of our Microsoft 365 service offering. Watch our video below to learn more.
What is supported?
Redstor currently supports the following:
- Backup and recovery of site structure (main site and subsites recursively)
- Backup and recovery of some owner/access details
- Backup and recovery of all document libraries identified as such
- Backup and recovery of lists based on the template types: documentLibrary, pictureLibrary, 851 (Asset Library)
(Note: You can use the Microsoft Graph API to view the metadata for a list, such as its template type. See Microsoft's documentation here.) - Recovery to original location (overwrite)
- Recovery back to SharePoint (new folder)
- Recovery using InstantData
Multiple domains/domain aliases are supported. Domain name changes will not affect backups and recoveries, and no additional user actions are required.
What is not supported?
Contents that are not currently backed up include (but are not limited to):
- Custom libraries not identified as document libraries (even if file-based)
- Default non-document libraries
- Custom metadata on files
- Custom site setup
- Lists based on the template type genericList
(Note: You can use the Microsoft Graph API to view the metadata for a list, such as its template type. See Microsoft's documentation here.) - Group sites
(Note: A group site is automatically created whenever a user creates a new Microsoft 365 group in the Microsoft 365 Admin Center. These group sites are not created for groups created in the Entra Admin Center, and have no bearing on sites created in SharePoint itself. Read more on Microsoft's knowledge base here.) - Pages and workflows
- Permissions on files
- Recycle Bin
- Sites with no name
- Archived sites
Also note the following limitations:
- Once a SharePoint site is associated with Teams, it is treated as a Teams backup by the RedApp. We therefore advise backing up both services to achieve full protection for your setup.
- It is not possible to exclude specific file types from backups.
- If a single SharePoint site has more than 1TB of data, the first-time backup can take a significant amount of time. Please contact your account manager or log a support ticket for assistance.
- Backup and recovery of SharePoint portals is not supported.
Guides
Use the guides below to manage your SharePoint backups.
How to add a backup set
To add a backup set, you need to be both a RedApp company administrator, and a Microsoft 365 global administrator for your tenant organisation. Read more about Microsoft's admin roles in this article on their knowledge base.
1. In the RedApp, go to the home page for the customer company you want to add backups for. Click on the search icon at the top right to find a specific customer.

2. To add a new backup set, go to Microsoft 365 in the sidebar on the left. If you do not see Microsoft 365 listed, you will need to add it as a product.

3. Click Add at the top right and go to Add backup set. 
4. Select SharePoint and click Sign in.

5. You will need to sign into Microsoft 365 and provide Redstor with permission to access your data. Click Accept.
Note:
- A separate window containing an authentication screen will pop up. If you do not see it, you may have a pop-up blocker enabled. To proceed, allow the pop-up and reattempt the authentication.
- If you encounter an "Access denied" error, click here.

6. You can now select accounts for backup. You have two options: include all accounts or select specific accounts.
Include all accounts (faster)
This option creates a backup set that includes all accounts in the tenant. Including all accounts for backup saves time during setup and reduces the possibility of human error.
- You can edit this selection at any time after the setup is complete by following the steps in How to edit a backup set below.
- Enable Include new accounts at the bottom of the page to ensure that future additions to this tenant are automatically added to the backup selection.
- Click Save to proceed.

Select specific accounts (more control)
This option lets you select specific accounts for backup from a list of all accounts in the tenant.
- If you have a large number of accounts, this list may take a few moments to load.
- You can edit this selection at any time after the setup is complete by following the steps in How to edit a backup set below.
- All accounts (sites) will be selected by default. Deselect the sites you do not want to backup, or deselect all and select only the sites you want to backup.
- Enable Include new accounts at the bottom of the page to ensure that future additions to this tenant are automatically added to the backup selection.
- Click Save to proceed.

Note: Sites without names cannot be backed up.
If you do not want to create this backup set, click Cancel at the top right.

You will be asked to confirm that you want to discard the backup set. Click Discard.

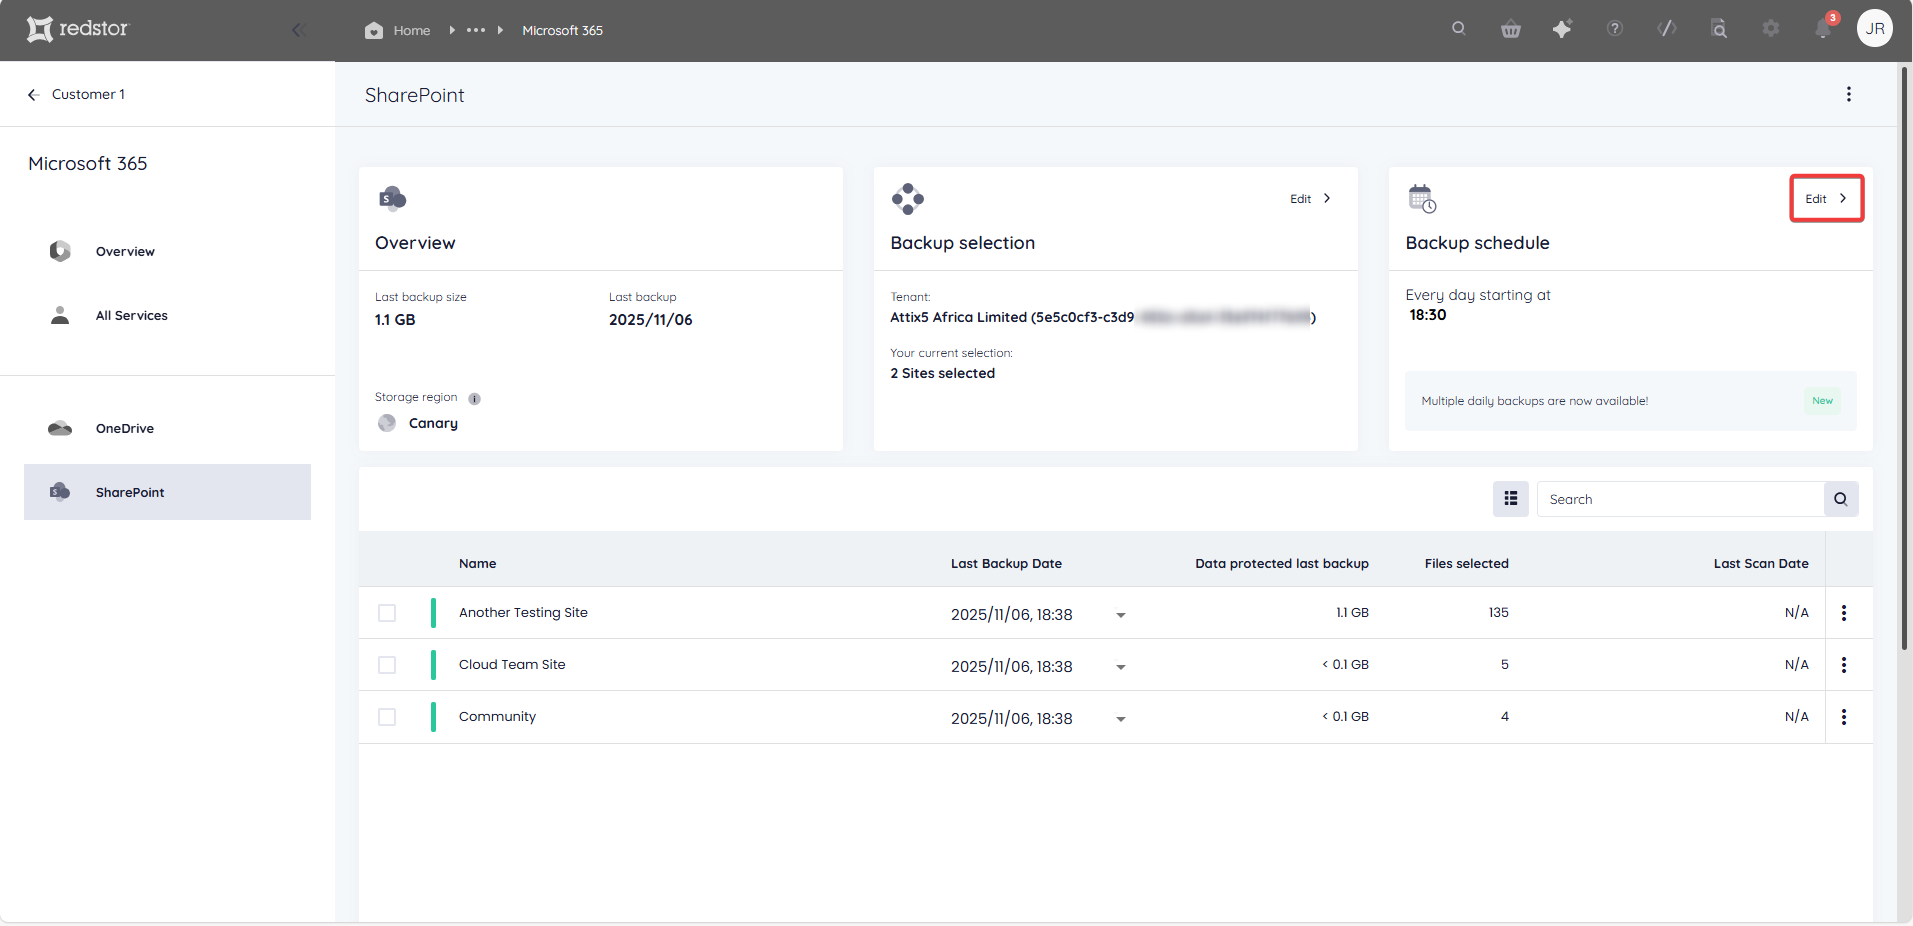
7. Once you have saved your selection, you will be taken to the home page for the new backup set, showing the relevant M365 tenant ID on the Backup selection card. The backup set name (in this case "SharePoint") will appear in the sidebar.
Note: For more on tenant naming, see Article 1643.

To queue a backup immediately, click on the menu icon at the top right and go to Backup. 
Once your first backup has completed, you can customise which columns you see in the backups table. To do this, click on the columns icon on the right, next to the search bar.

Select which columns you would like to see, then click Apply.

To view an audit trail of key actions and which users performed them, click on the inspect icon at the top right of the page.

How to edit a backup set
1. On the backup set home page, go to Edit from the Backup selection card.

2. Select/deselect the sites you want to add/remove and click Save to apply your changes.
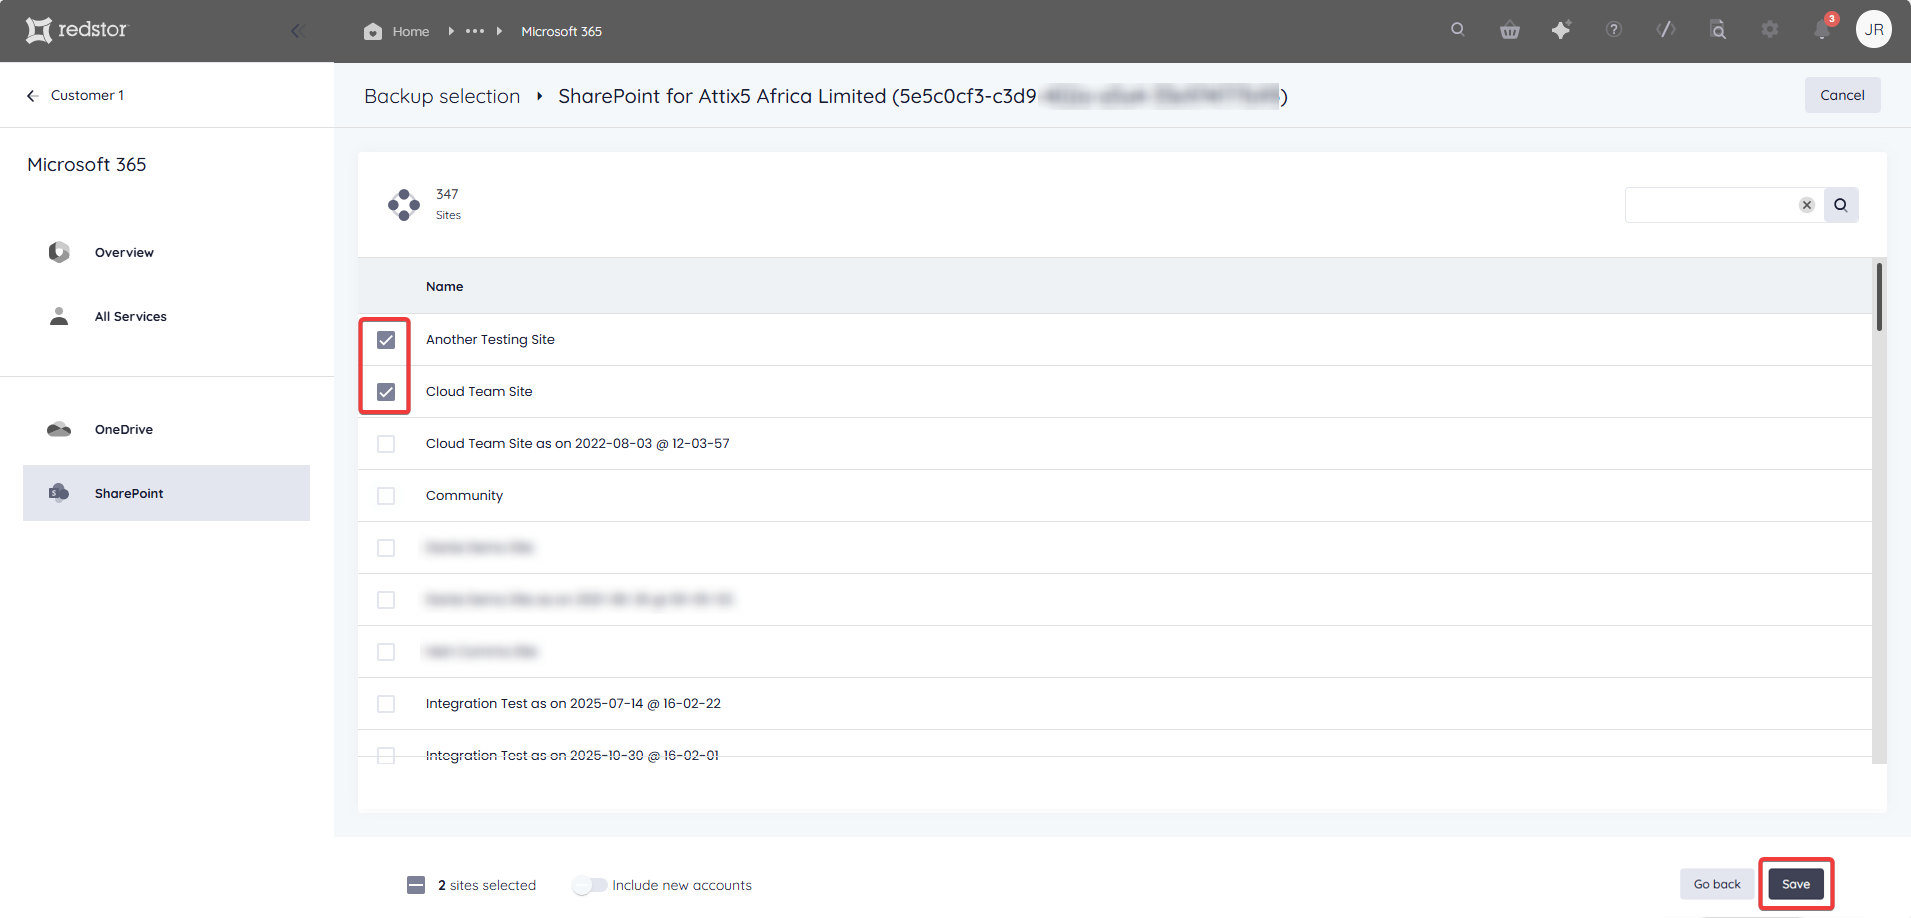
You can also use the search field to find a specific site. Click Save to add it to the backup selection.

To discard your changes, click Cancel at the top right.
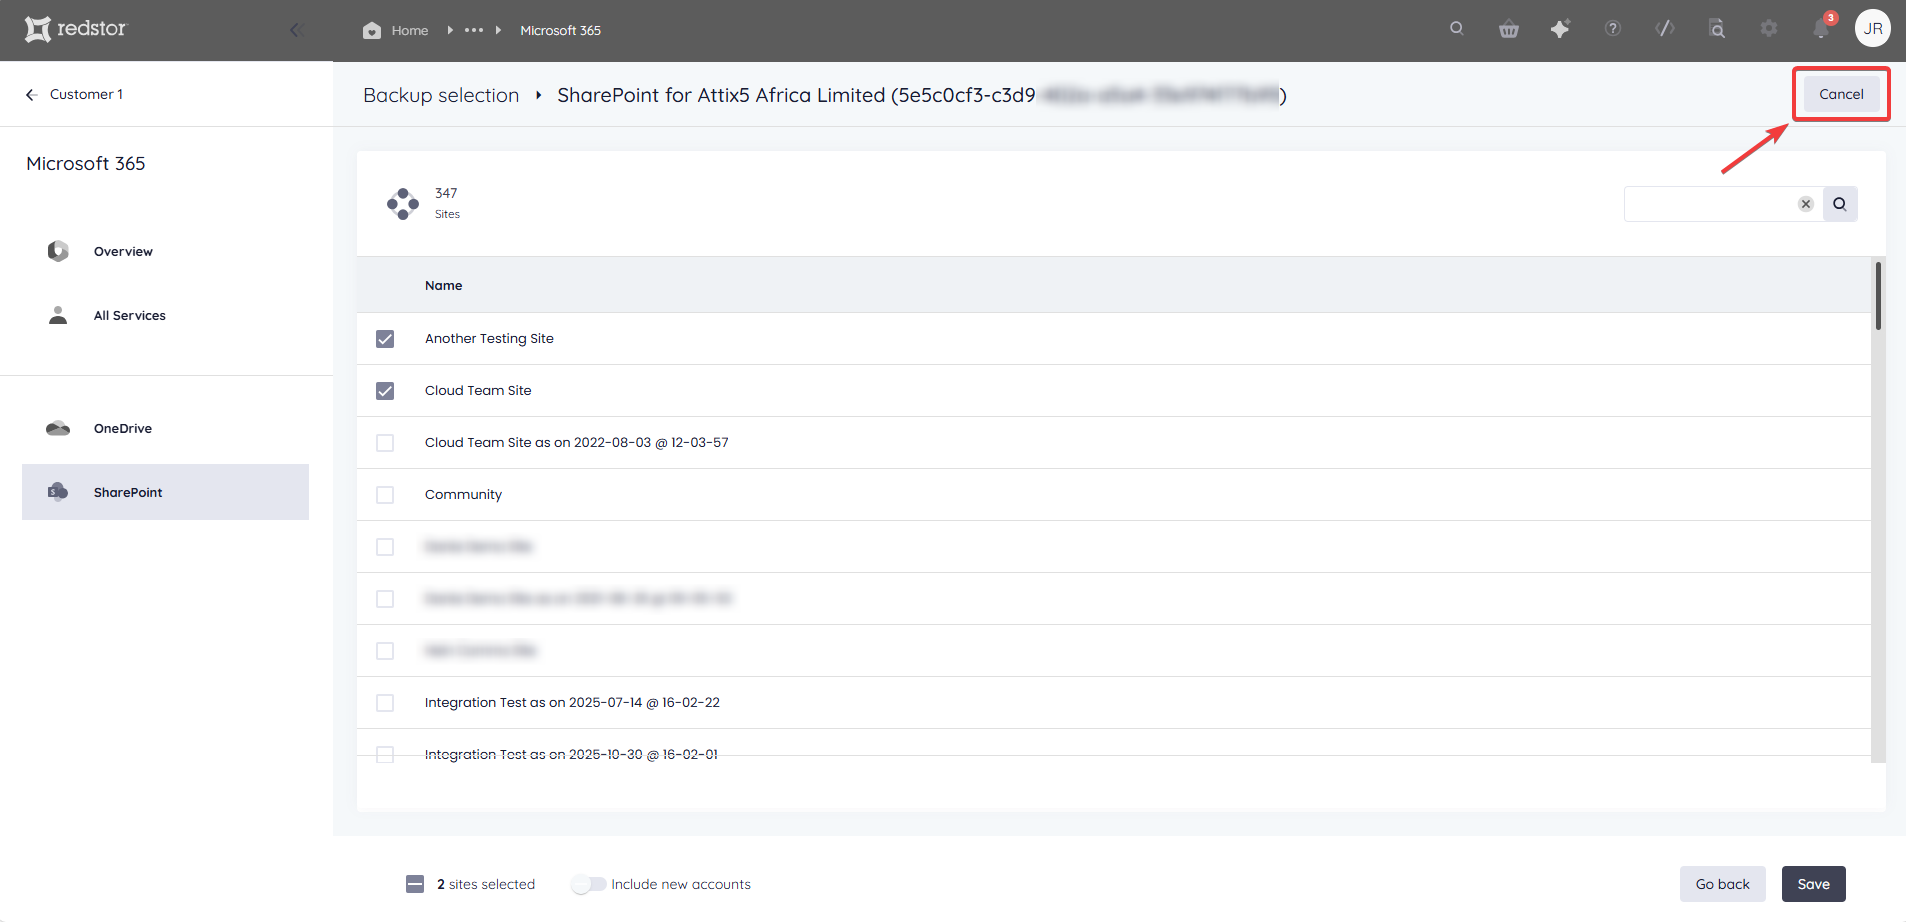
You will be asked to confirm that you want to discard the changes. Click Discard.

The new number of sites selected will show under Backup selection on the backup set's home page.

Note: Accounts that have been removed from the backup selection are still retained on the Storage Platform until you permanently delete them using the Storage Platform Console. Read more in Article 1384.
How to configure the backup schedule for a backup set
1. On the home page for the relevant backup set, click on Edit on the Backup schedule card.
2. Select the days on which you would like backups to run, as well as a backup time. You can choose between daily and custom backups.
- For daily backups, select the number of backups per day (1 or 3). In the case of 3 backups per day, the backups will run at the specified backup time, as well as 8 hours after and 16 hours after the specified time. For example, if the specified time is 02:00, backups will run at 02:00, 10:00, and 18:00. Running multiple daily backups instead of a single daily backup will not incur additional costs.
 Note: Multiple daily backups is only available as part of our M365 Premium edition. If you do not see the option to schedule multiple daily backups, you are on a legacy pricing plan. If you would like to enable multiple daily backups, please speak to your account manager about upgrading.
 - For custom backups, select the days and time that you want your backups to run.
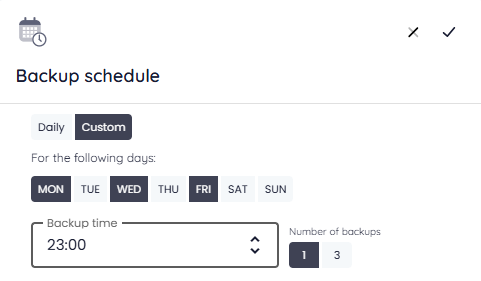
3. Click the check mark at the top right to save your settings. The Backup schedule card will now show the updated backup time/s.

How to recover a backup set
1. Select data for recovery
2. Select the recovery method
3. Proceed with recovery
To do a first recovery, you need to be both a RedApp company administrator, and a Microsoft 365 global administrator for your tenant organisation. To do subsequent recoveries, you need to be a RedApp company administrator and a Microsoft 365 SharePoint admin. Read more about Microsoft's admin roles in this article on their knowledge base.
The following should be noted with regard to SharePoint recovery:
- Recover to a new location creates a new site with a timestamp, e.g. Site A as on 2020-05-14 at 06-37-12.
- Recover to original location will recreate the subsites and document libraries if they no longer exist. However, it is not possible to recover a single item from a SharePoint subsite, since the parent site will not be recovered.
- Recover to original location will fail if the original location has been deleted. The details of the failure can be found in the activity history for the specific recovery. A workaround for this is to recover to a new location and then rename the new site with the name of the original site.
- Recover to original location (if the location exists) will overwrite any existing files.
- Files recovered back into SharePoint will have their original timestamps preserved, as well as their titles and any values entered for custom columns (except for the image column, which is not supported). Other metadata and permissions will not be restored.
Follow the steps below to start recovering.
1. Select data for recovery
In all cases, you will need to select the site/s or item/s you want to recover, as well as the backup (date) you want to recover from.
There are different ways you can select data for recovery.
If you want to recover a specific site, use the Search function to find it.

Under Last Backup Date, select the backup you want to recover from.

Click on the site's menu icon on the right and go to Recover to see your options.

If you want to recover all data for multiple sites, select the sites and then select a backup date for each. You can select different backup dates for different sites.
Note: If you need to recover multiple sites, it is advised to recover them in bulk (all at once) and not in sequence (one after the other). It is not possible to queue a recovery while another recovery for the same backup set is in progress. 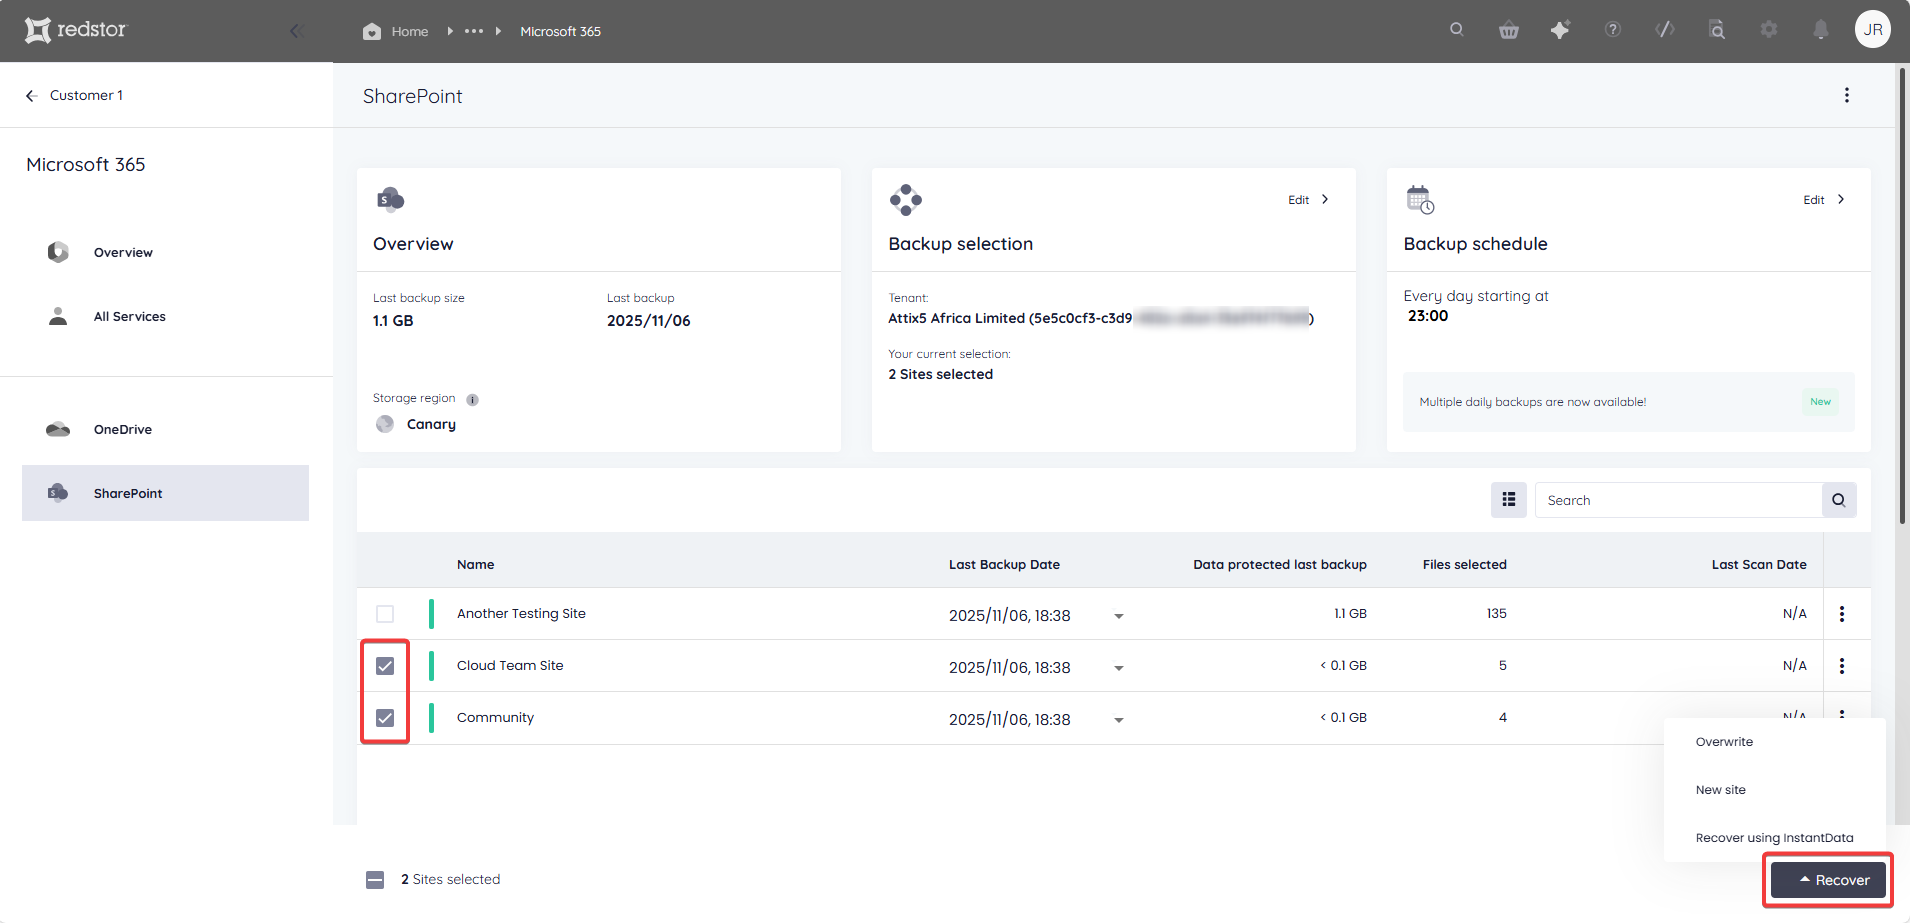
If you only want to recover one or more individual items from a site, click on the site name to expand its contents. Alternatively, click on the menu icon on the right and go to Open.

Drill down into the site contents and select what you want to recover. When you are ready, click Recover.

You can also use the Search field to find a specific item to recover.

Select the item/s for recovery and click Recover.

2. Select the recovery method
Next, you will need to choose how you want to recover your selected data.
- Overwrite recovers the data to its original location, overwriting whatever is present there.
- New site recovers the data to a new site with the backup date's timestamp appended to its name.
- Recover using InstantData generates a shareable link that can be used to recover the data. Each link can only be used to initiate one restore.
3. Proceed with recovery
After choosing a recovery method, you will need to authenticate with your RedApp user through a one-time pin.

You will also need to authenticate with an appropriate Microsoft 365 user (global admin for first recovery, global or SharePoint admin for subsequent recoveries). A separate window containing an authentication screen will pop up. If you do not see it, you may have a pop-up blocker enabled. To proceed, allow the pop-up and reattempt the authentication.

For Overwrite and New site restores, you will not need to complete further steps. You will see a series of notifications at the bottom of the page to show that the restore has been initiated. A progress bar will also appear at the top of the page.
To cancel an Overwrite or New site restore, click Cancel at the top right as soon as the restore starts.

Click Yes to confirm.

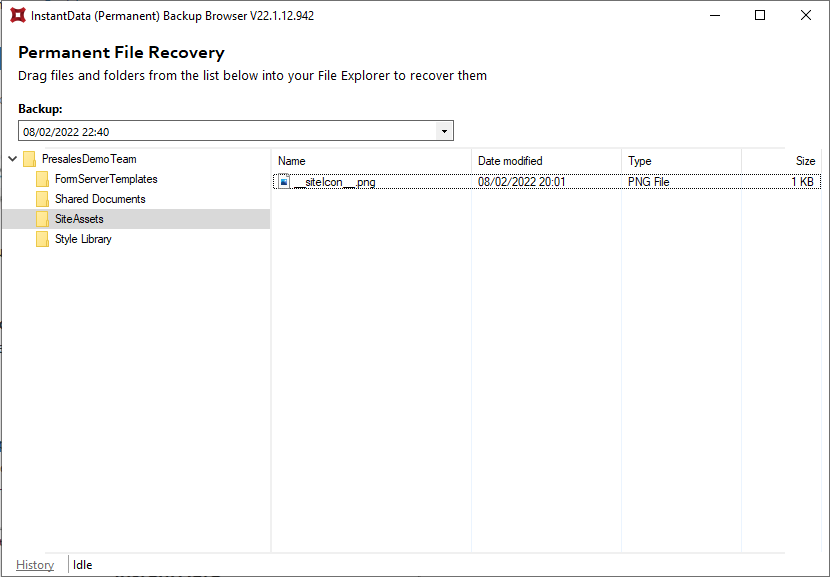
For InstantData restores, watch our video or follow the steps below to proceed.
Use the Copy option to share a link to the InstantData application, or Download the application immediately.

Run the application on the machine where you want to recover the data. Select between Permanent and Temporary recovery, then simply drag and drop files from the application into your File Explorer to recover them.

How to delete a backup set
Note: This will delete all backed-up data for this backup set. This can only be undone within the first 336 hours (approximately 14 days) after deletion. To request an undelete, please log a ticket with our support team.
1. On the home page for the backup set, click on the menu icon at the top right and go to Remove.

2. Confirm the deletion by clicking Remove. If you need to cancel the deletion, close the dialog box.

3. Authenticate with your RedApp user to proceed with the deletion.
How to change a backup set's name
1. On the home page for the relevant SharePoint backup set, click on the menu icon to expand more options, then click Rename.

2. Enter the new name for the backup set and click Update. To cancel, close the dialog box.

 1.png)