
.png)




From a customer's Connections page, the MSP Admin or Customer Admin can connect the customer's account to their Microsoft 365 tenant. This comprises three steps: signing into Microsoft, adding a non-delivery report (NDR) email address, and adding a journaling rule.
- An MSP admin can add a customer connection only if they have a Global Administrator role in the customer's Microsoft 365 tenant.
- A Customer admin can add the connection themselves only if they can access the Platform with login credentials received from their MSP admin.
To configure a Microsoft 365 connection, follow the steps below.
- Connect Microsoft 365
- Add a non-delivery report (NDR) email address (Email Security only)
- Add a journal rule (Email Security only)
- Deploy the Outlook add-in for Email Security (optional)
- Create a Microsoft 365 outbound connector (for SpamTitan customers)
- Disable Link Lock in SpamTitan
Connect Microsoft 365
1. Under M365 Connection, click Connect Microsoft 365.
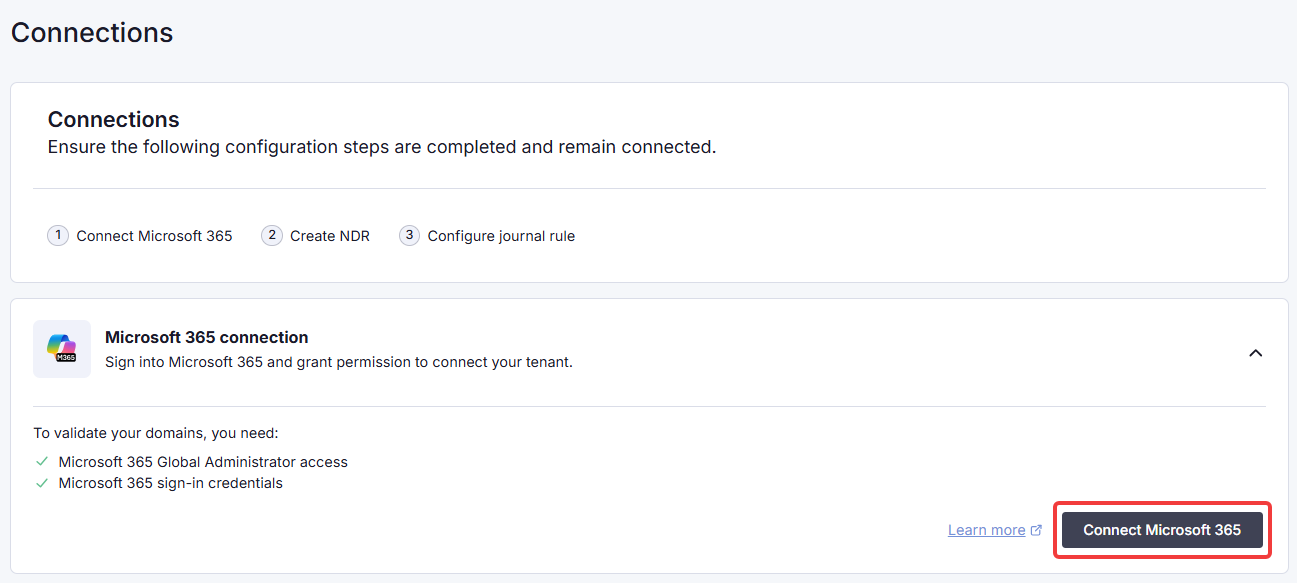
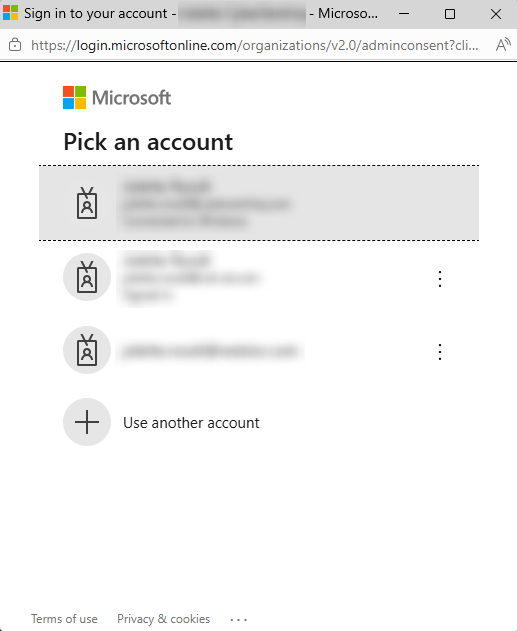
2. Select the applicable Microsoft account (a Global Administrator for the tenant) and sign in.
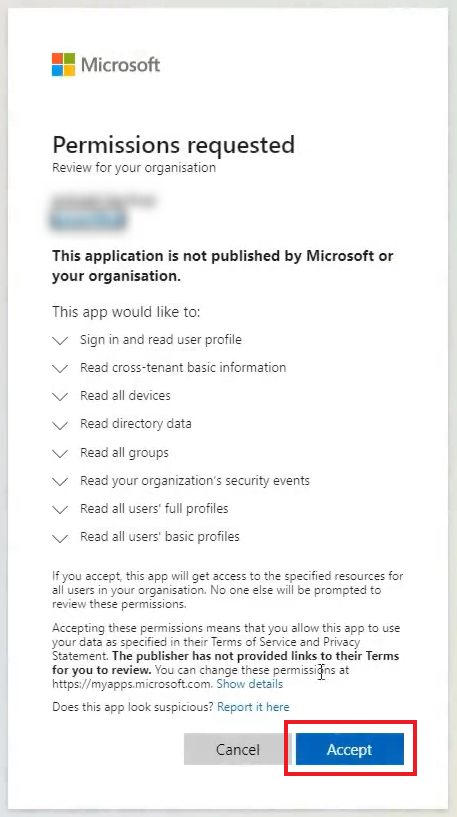
3. Review the requested permissions and click Accept.
You will see a success notification, and the status will change to Connected

Add a non-delivery report (NDR) email address (Email Security only)
Under NDR email address, verify the tenant where the NDR email address will be created. This is where any non-delivery reports (NDRs) for undelivered journal reports will be collected, as they cannot be returned to the sender. For more information, see this article: Alternate journaling mailbox | Microsoft Learn
If you have an NDR email address in place in your M365 tenant, it will be updated our designated email address.
Note: To keep using your current NDR email address, skip this section and configure only the journal rule.
To proceed, click Create NDR email address.
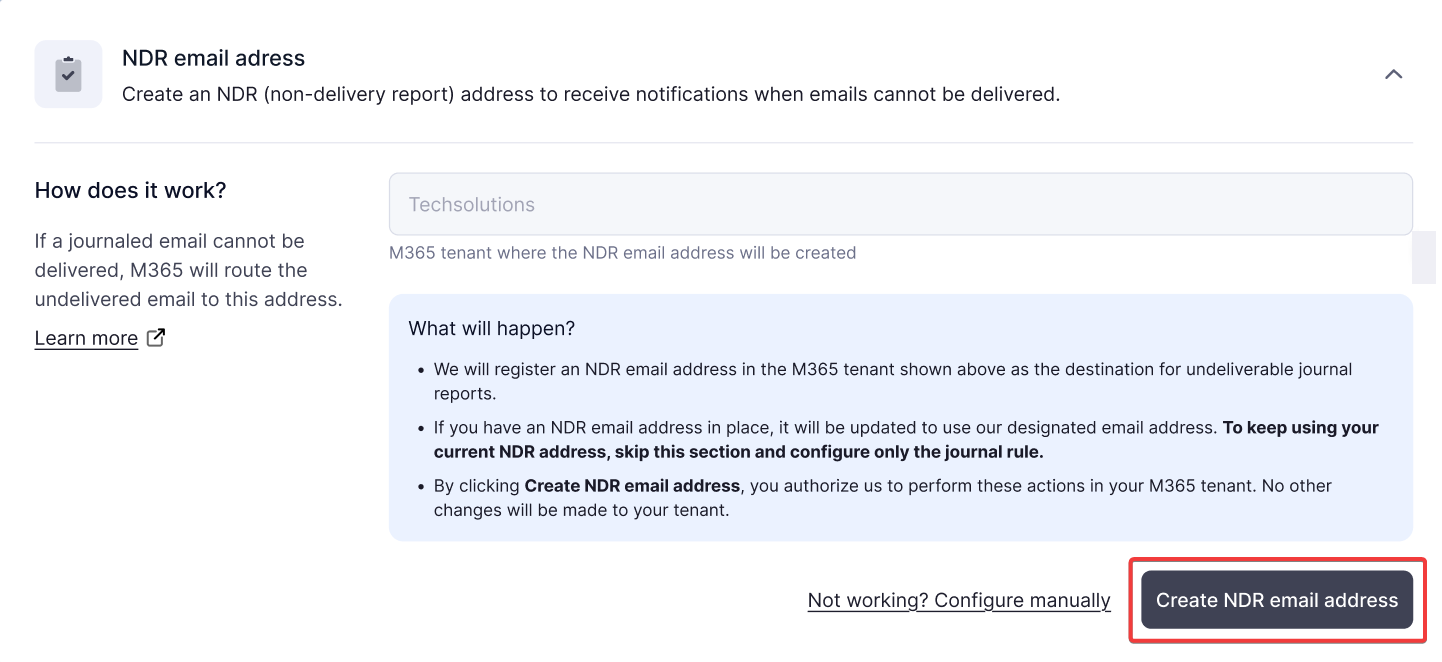
Once the NDR email address has been created, you will see a success notification and the status will change to Active.
If the NDR email address creation fails, you can create an email manually by following these steps:
- Click on Not working? Configure manually.
- Copy the provided NDR email address.
- In the Microsoft Purview compliance portal, navigate to Solutions → Data lifecycle management → Exchange (legacy).
- In the field Send undeliverable journal reports to, paste the copied NDR email address.
- Click Save.
If you are still unable to create the NDR email address, please contact our support team.
Add a journal rule (Email Security only)
A journal rule allows a copy of every email sent or received in your organization to be sent to a journaling mailbox, from where it can be analyzed for spam, phishing and other threats. Note that the journal rule can only be created once an NDR email address has been configured. For more information, see this article: Journaling in Exchange Online | Microsoft Learn
Under Journal rule, verify the tenant where the journal rule will be created. Then click Generate rule.
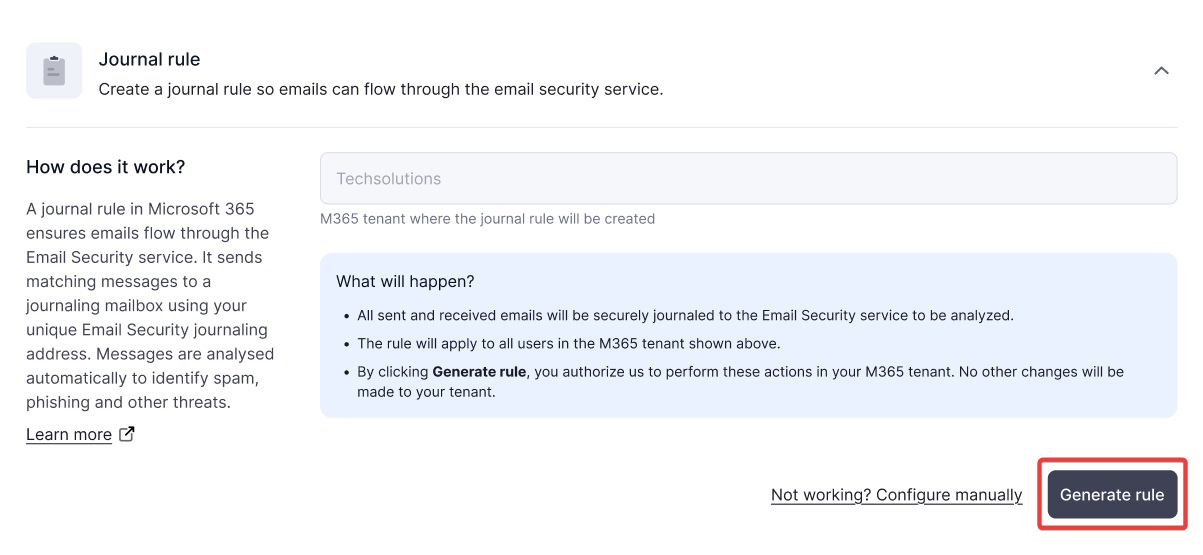

If rule generation fails, you can create a rule manually. In this case, we cannot automatically validate your setup, but you can test your configuration in the Microsoft Purview compliance portal. To do this:
- Click on Not working? Configure manually.
- Copy the provided journal email address.
- In the Microsoft Purview compliance portal, navigate to Solutions → Data lifecycle management → Exchange (legacy) → Journal rules, then select + New rule.
- In the field Send journal report to, paste the copied journal email address.
- In the field Journal Rule Name, enter a name for this rule, for example "Email Security".
- Apply the rule to everyone and all messages. If you need help, see this article: Manage journaling in Exchange Online | Microsoft Learn
- Click Next and then Submit.
- Click Confirm and then Test Configuration.
If you are still unable to create the journal rule, please contact our support team.
Deploy the Outlook add-in for Email Security (optional)
Follow the steps below to deploy the Outlook add-in. See Microsoft's knowledge base for more information: Deploy Office Add-ins in the Microsoft 365 admin center | Microsoft Learn
1. In the Microsoft 365 admin center, go to Settings → Integrated apps.
2. Go to Add-ins → Deploy Add-in.
3. In the Deploy a new add-in wizard, select Upload custom apps.
4. On the TitanHQ Platform, copy the Outlook add-in link provided under Connections → Security enhancements → Install the Outlook add-in in the right sidebar. The link will be in this format: https://protect.titanhq.com/manifest.xml
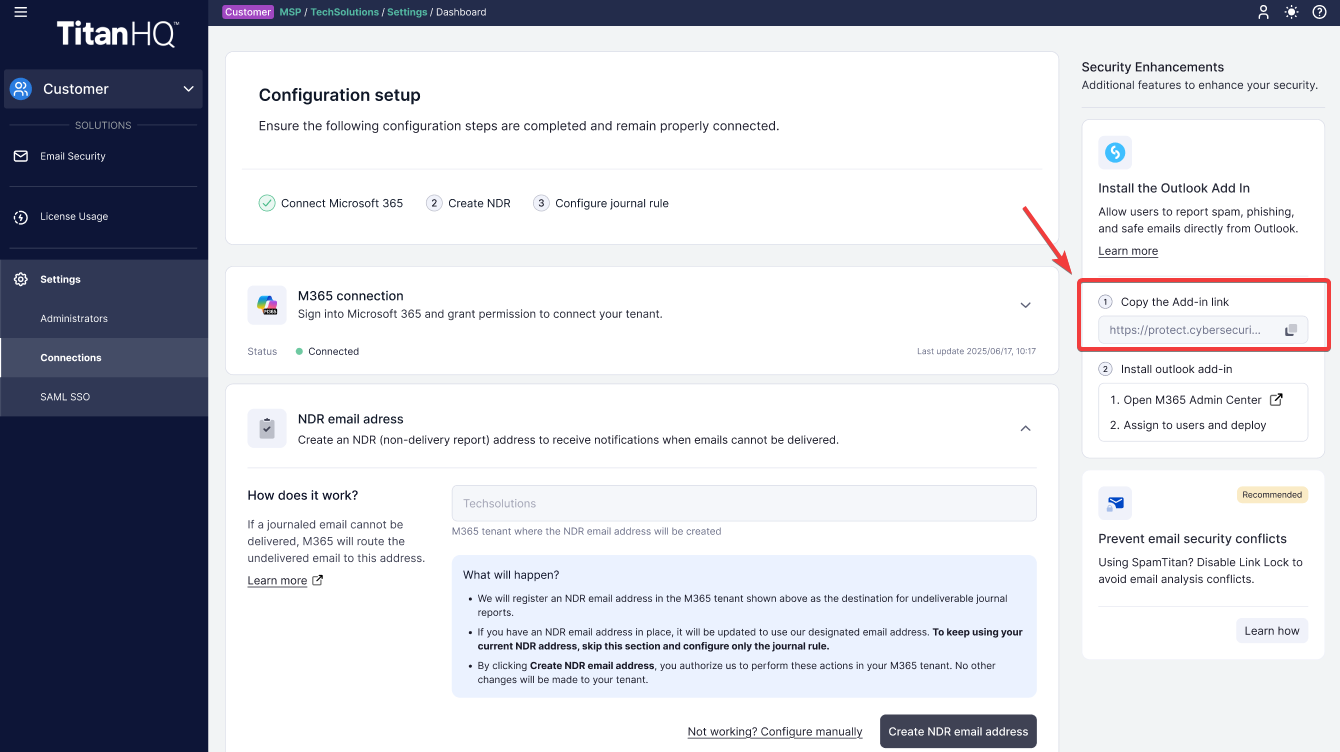
5. Back in the admin center, under Choose how to upload app, select Provide link to manifest file and enter the Platform link. Click Upload.
6. Under Assign users, specify the users of this add-in. It's best practice to deploy to a single user first, to test the functionality.
7. Click Deploy. Deployment time varies depending on your environment.
8. Once the deployment has completed and you've confirmed the add-in's functionality, click Change who has access to add-in to deploy to more users. The add-in will be available in the Outlook desktop client, web application, and mobile app.
Create a Microsoft 365 outbound connector (for SpamTitan customers)
Email Security customers using SpamTitan to send outbound mail must set up a Microsoft 365 outbound connector before completing their Email Security configuration. This connector allows outbound SpamTitan mail to pass through the Email Security service. For more information, see this article in Microsoft's knowledge base: Set up connectors to route mail between Microsoft 365 or Office 365 and your own email servers | Microsoft Learn
To set up the outbound connector:
1. Log into the Exchange admin center.
2. In the sidebar, go to Mail flow → Connectors.
3. Click Add a connector and select the fields as shown.
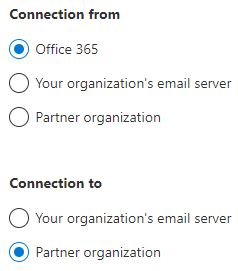
4. Click Next.
5. In the Connector name window, complete the fields.
- Under Name, give the connector a meaningful name, for example, SpamTitan Outbound to Email Security.
- In the Description field, enter an optional description for this connector, for example, Allow Email Security to receive SpamTitan outbound mail.
6. Enable Turn it on and click Next.
7. In the Use of connector window:
- Select Only when email messages are sent to these domains.
- Enter graph-in.us-east-2-01.prod.titanhq.com in the dialog box, and click +.
- Enter graph-ndr.us-east-2-01.prod.titanhq.com in the dialog box, and click +.
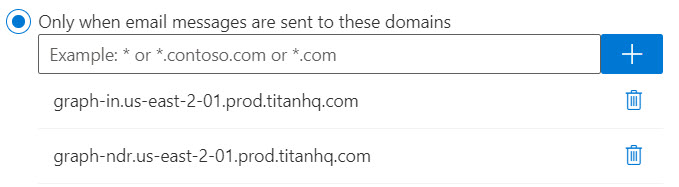
- Click Next.
8. In the Routing window, select Use the MX record associated with the partner's domain and click Next.
9. In the Security restrictions window, click Next to accept the default TLS settings.
10. In the Validation email window:
- Enter validate@graph-in.us-east-2-01.prod.titanhq.com in the dialog box, and click +.
- Click Validate. A test email will be sent to the email address.
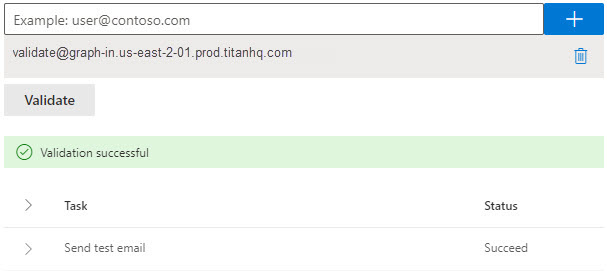
- Verify the information is correct, then click Next.
Disable Link Lock in SpamTitan
Follow the steps here: Disable Link Lock in SpamTitan
 1.png)