
.png)


PAGE CONTENTS
Introduction
To backup a machine or server, you will need to deploy an Enterprise Server Edition (ESE) backup agent from the RedApp, download it, and install it on the machine. To do this, follow the steps below. If you have already downloaded your agent installer file, skip to here.
Please note: An installer file deployed from the RedApp is valid for 48 hours and can be used on unlimited machines/servers.
If you need help recovering a machine/server, see Article 1316.
Requirements
The main criteria for a successful installation of our backup agent from the RedApp are as follows:
- There must be no other Redstor installation already in place on the machine. Uninstall any previous agents, and remove any leftover directories. If the installer detects an existing agent on the machine, the installation will not complete.
- The installer must have been deployed from the RedApp no more than 48 hours before installation. Any older installer will create an empty agent instead of creating a backup account automatically.
- The machine where the agent is being installed must have connectivity to everything listed in the Redstor Network Requirements.
- There must be sufficient storage and licenses available in the target group to allow the creation of the new account (and the target group must still exist, i.e. must not have been deleted). For most customers, storage and licences should both be set to unlimited, so this is unlikely to be an obstacle.
- The backup agent must be able to save its settings to configuration files within its installation directory. Sometimes these settings file changes are blocked or quarantined by antivirus software. Please see Article 008 for more information.
- There should be no other accounts with names that match the machine's hostname.
How to backup a machine using the RedApp
Watch our video or follow the steps below.
Step 1: Create a folder to house your machine's agent
1. In the RedApp, go to My Company or to the relevant customer company.
2. Go to Machines in the sidebar on the left. If you do not see Machines listed, you will need to add it as a product.

3. Click on Add folder at the top right.

Note:
- A folder refers to what is known as a group in the Storage Platform Console. Multiple folders (groups) form a collection.
- You can also choose to add a collection instead of a group. To do this, expand the menu (three dots) and click Add collection.

4. Enter a name for the new folder and click Add.

5. Once the folder has been created, you will see an overview for it. Click the menu icon next to the Deploy button to expand the folder actions. Select Set storage limit.

6. Set a default storage limit for the machines in this folder, and click Update to save.

Step 2: Deploy an agent to install on your machine/s
1. On the same overview page, click Deploy at the top right.

2. Select the machine's operating system. For a list of all supported operating systems, see our System requirements and compatibility matrix.

3. For optimal functionality, enable Full system backup and Remote access.

When Full System Backup (FSB) is enabled, system information from the time of the backup (e.g. the OS, any installed software, installed updates, and hot fixes) is always included in the backup selection. Read more in Article 1192 - Full System Backup (FSB) and Full System Recovery (FSR).
When remote access is enabled, it means that once the agent is installed on a machine/server, you can open a remote connection to that machine any time, and from anywhere, as long as the machine is on/powered.
- To remotely access a machine from the RedApp, click the menu to the right of the machine listing and go to Download remote agent.
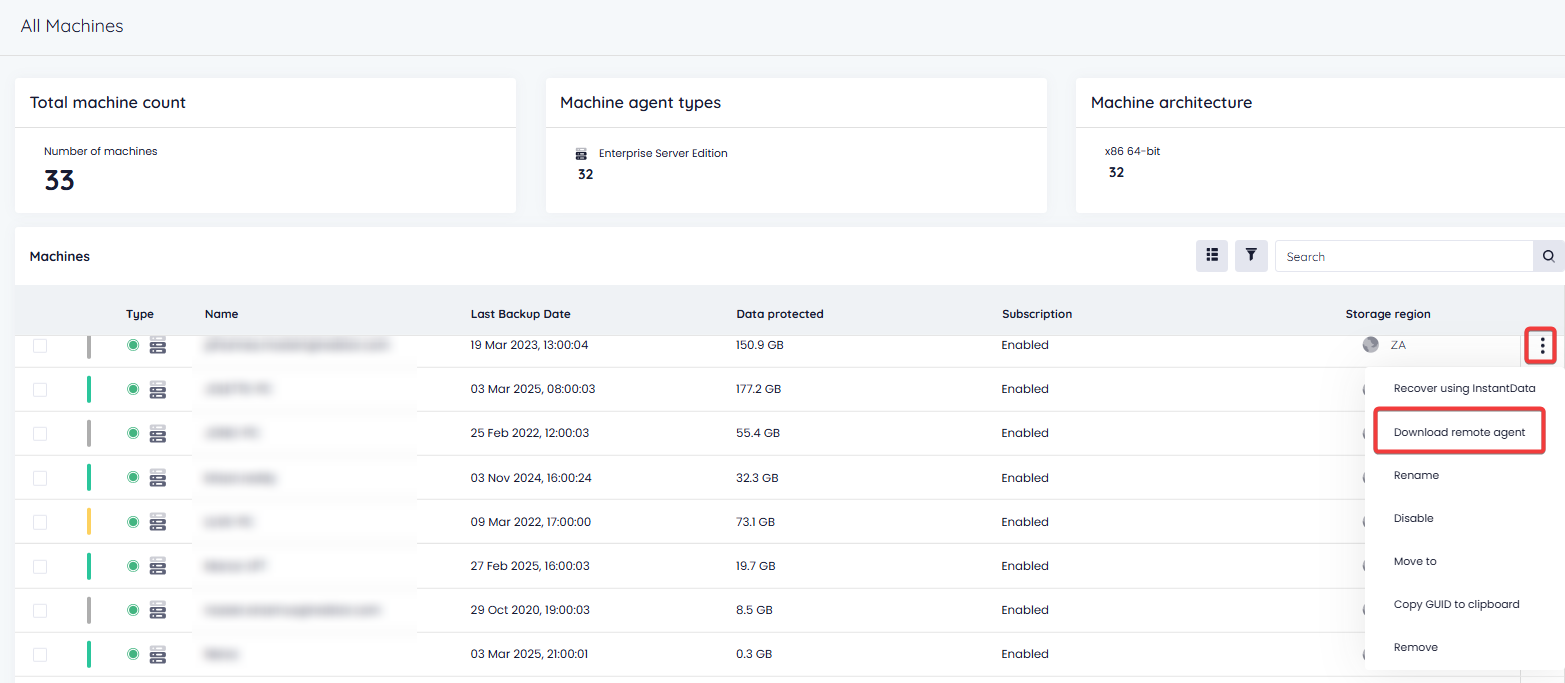
- You will need to download and execute the provided .exe file to create a secure tunnel to the agent. You can then trigger backups, manage files, etc. as if you were physically using the machine.
4. Enter an encryption key of your choice (minimum 8 characters), or click the refresh button to generate a random, secure key. In either case, store this key in a safe place.

5. Click Download agent to get the installer file for the backup agent. This installer file will be valid for 48 hours and you can use it on unlimited machines.

Step 3: Install and set up the agent on your machine
Windows
1. Run the downloaded installer file on the machine or server you want to backup. If you get stuck at this step, see Article 1518.
2. Once the installation has completed, you can open the Agent from the Start Menu. If the application is not yet visible, you can open the tray application in C:\Program Files\Redstor Pro\Backup Client ESE from the File Explorer.
Mac
See Article 1290.
See Article 1583.
Step 4: Start backing up
To run your first backup from the ESE agent, click the Backup button at the top left.

- You can edit the backup selection if you do not want to backup the machine's entire system.
- You can configure machines retention from the RedApp by following the steps in Article 106.
- For more on how to make the most of the ESE agent, see Article 105.
- If you need help recovering a machine, see Article 1316.
 1.png)